Fingerless Feather Mittens Pattern Released

Designed to match the Feather Cap Beanie, these fingerless mittens reflect the patterns and colours of my little flock of beautiful Cream Legbar hens (and one cockerel).

Fingerless Feather Mitts are stranded knit mittens, using ten colours of Jamieson’s of Shetland wonderful pure wool Spindrift yarn. The motif itself and the colours I have chosen reflect the feather patterns and colours of my lovely Cream Legbar chickens: Freddie, Sorrel, Sage, and Lavender. From a distance they look a like a dull brown, but close up, their feathers are a beautiful brown/grey, with touches of cream and pink. The four background colours and six foreground colours reflect this lovely effect.

Sorrel

Suggestions are made for other colourways, notably a lovely monochrome palette.

The pattern is available from the Granary Knits Pattern Store .

Incorporating a Thumb in Top-down Mittens

There are, of course, several ways to knit a mitten, and I have tried most of them. My favourite technique, at the moment, is to knit the thumb first, place it on waste yarn, and then begin the mitten at the fingertip end, knitting down the hand until you reach the point when you incorporate the thumb. You can try the mitten on at every stage, to get the most comfortable width for you and the best length before you add in the thumb. It also has the advantage that the technique for casting on for full mittens is identical to that for toe-up socks, so if you are a sock knitter, the method is entirely familiar.

This technique is used in several of my mitten patterns: Fingerless Feather Mittens, Full Feather Mittens, and my free pattern for sock yarn mittens; this photo tutorial is an aid to those patterns. The thumb is incorporated into the mitten and a gusset is then knit to taper the mitten.

Thumb

First, knit your thumb, according to the pattern you are using. This can be a half-thumb (for fingerless mittens) or a full thumb.

Thread the first 2 stitches and the last 2 stitches of the round onto a small piece of waste yarn, and thread the remaining stitches of the thumb onto a longer piece of waste yarn.

Mitten

Work the first part of the mitten, from fingertip/fingerless mitt ribbing, to the point where the thumb joins the palm. The mittens are identical for the purposes of attaching the thumbs. Ensure you have worked the mitten to 2 stitches before the end of the round where you will attach the thumb. Using a piece of waste yarn, thread the two stitches from the beginning of the mitten round and the 2 unworked stitches from the end of the round onto the waste yarn, as you did for the thumbs.

Take one of the pre-prepared thumbs and remove the longer piece of waste yarn as you place half the remaining thumb stitches onto one of the mitten needles and the other half onto the other needle; the 4 stitches still on the waste yarn should be sitting adjacent to the mitten stitches also on waste yarn.

Round 1: Knit around the mitten and thumb once, the start of round now being the last mitten stitch of the round, adjacent to the first thumb stitch.

Round 2: ssk the first mitten stitch with the first thumb stitch, knit across the thumb to the last thumb stitch, k2tog the last thumb stitch with the next mitten stitch. Knit around the mitten to the end of round. [2 stitches decreased]

Round 3: knit

Repeat rounds 2 and 3 until all thumb stitches have been decreased.

Knit straight until mitten reaches your wrist bone, then add the cuff of your choice.

Once the gusseted thumb has been incorporated into the mitten, you can close the gap by grafting/Kitchener stitching the 4 stitches of the mitten with the 4 stitches of the thumb. See YouTube video https://www.youtube.com/watch?v=pJFRI-_EQeA for a great tutorial on Kitchener Stitch.


Simple Linen Stitch Cowl

As I mentioned in an earlier post, I have been cataloguing my yarn stash and came across some hidden gems of yarns purchased long ago and with no plan for their use, and I decided to design a simple cowl that would use them up. This pattern is part of my Love Your Stash Challenge for 2019, in which I aim to use yarn from stash for a series of simple accessories.

The yarns are Louisa Harding Grace Hand-Dyed, a DK weight yarn, in two colours. I have two skeins each of Coastal, a gorgeous bright turquoise, and Festive, a rich purple. Both yarns are tonal, and provide a total of 404 metres (440 yards), which is more than enough for a good sized cowl; in fact, I only needed one skein of each for the cowl, using virtually every scrap, so the rest will make a matching hat.

For this cowl you will need:

101 metres (110 yards) of DK weight yarn in colour1 and 101 metres (110 yards) of DK weight yarn in colour2

4 mm (UK/Can size 8, US size 6) circular needle, at least 40cm long (as long as you like if using magic loop)

5 mm (UK/Canadian size 6, US size 8) circular needle, at least 40cm long (as long as you like if using magic loop)

A stitch marker to mark the beginning of the round

A tapestry needle to weave in the yarn ends

The PDF version of the pattern can be downloaded from the Granary Knits Pattern Store. Have a look through your stash, gather your tools together, and happy knitting!

Three-Needle Bind Off

Three-needle bind off is a very useful technique for joining two pieces of fabric. It can be used to create a firm shoulder seam on a sweater, to close the toe of a cuff-down sock (if you don’t want to use Kitchener stitch), or to complete a folded cuff or hem.

It is important not to stretch or pull the stitches too much, and to this end I am using 3 different sizes of needle: the inner cuff has been knit on a 3mm circular needle (brass); the purl bumps are picked up on a 2mm circular needle (dark wood); and the casting/binding off is performed with a 3.75mm double-pointed needle (light wood). The 2mm needle stops the picked up stitches being stretched out of shape, and the 3.75mm needle ensures that the cuff bind off lies flat and is not ruffled.

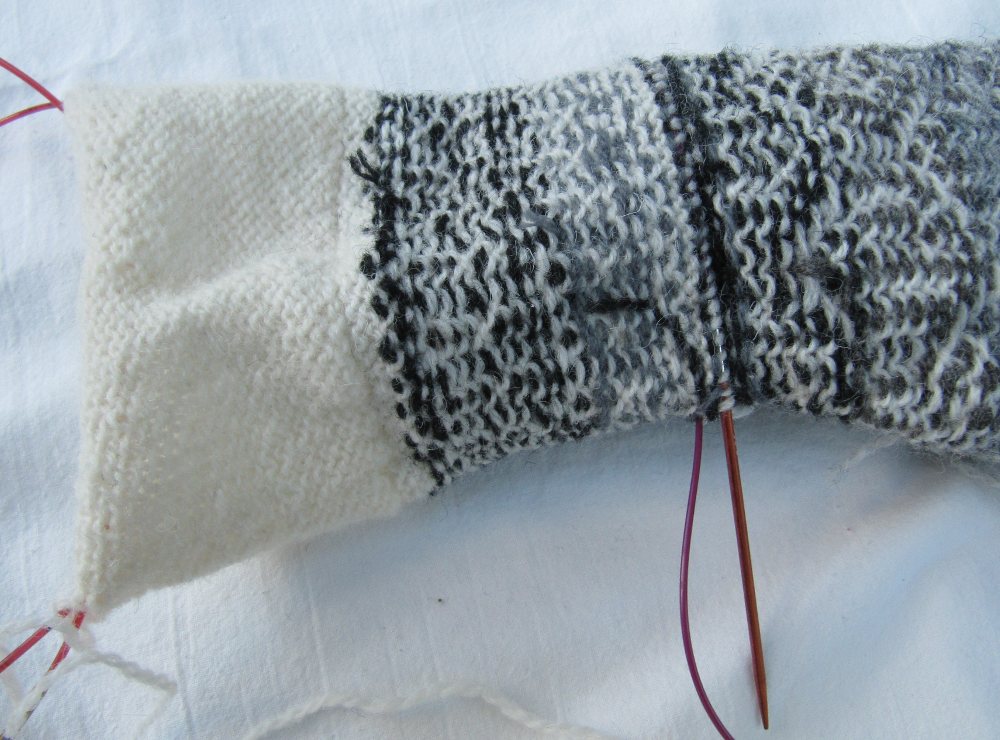
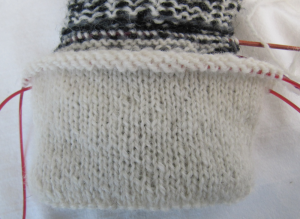
I shall illustrate the technique using the cuff of a mitten. The mitten has been knit top down, with a patterned outer cuff and a plain inner cuff, the inner cuff has been knit to the correct length for folding under, and the mitten has been turned inside out.

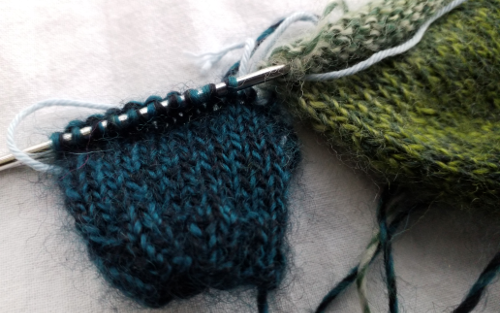
First, you need to pick up stitches around the beginning of the cuff. In the example mitten, these are purl bumps and are quite clear, being the background (white) stitches along the lower edge of a Latvian Braid.

The number of purl bumps to pick up should match the number of stitches to be bound off – in this case, the inner cuff has 60 stitches, so I have picked up 60 purl bumps. Beginning at the start of the round, place the tip of your 2mm needle into the purl bump as though you were purling a stitch, and lift the bump onto the needle; repeat for the second stitch, and so on until stitches have been picked up all around the cuff and you have the correct number of stitches on your 2mm needle.
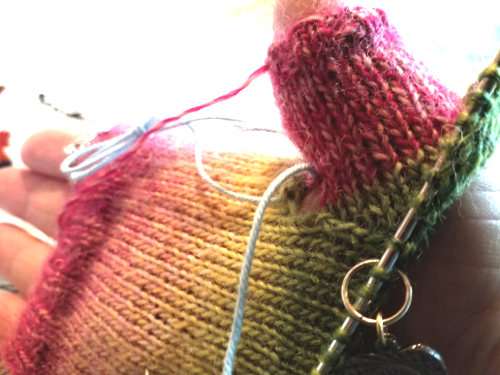
Next, fold your cuff along theĀ  edge line (this is a round of purl stitches at the fold point, designed to help the folded cuff lie flat) so that the live cuff stitches meet the picked up stitches.

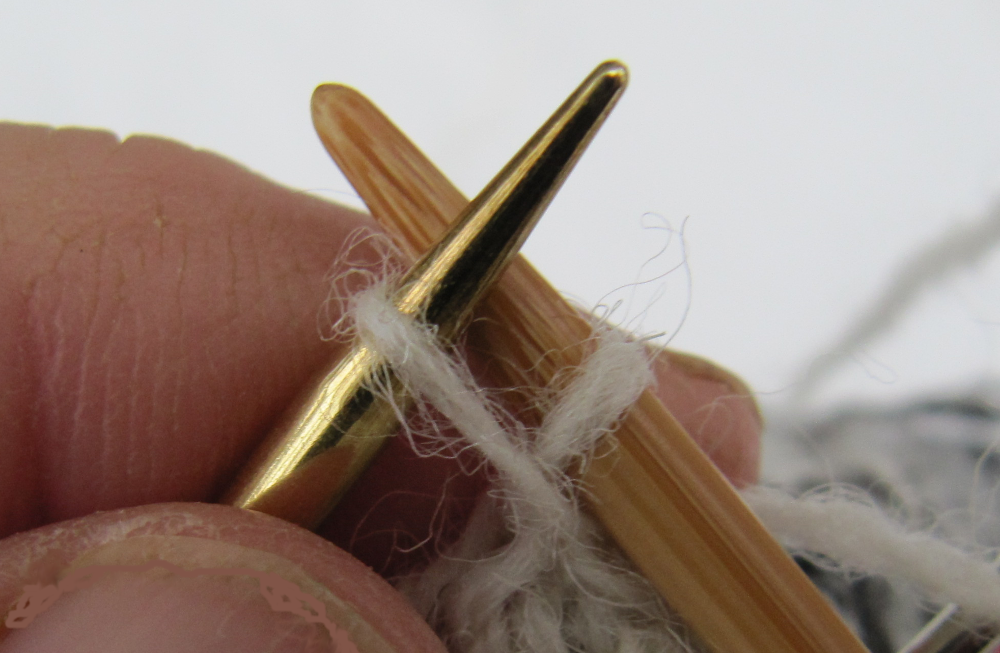
In this photograph, the purl bumps are on the back dark wood needle, the live cuff stitches on the front brass needle. Take your largest needle, in this case 3.75mm (light wood), and put it through both the front and back stitch to knit them together.

Knit these two stitches together, and repeat for the second stitch on both needles. Then pull the first stitch you knitted over the second stitch, as you would do when performing a normal cast/bind off.

Repeat for the third stitch pair, and so on, until all pairs of stitches have been cast off. I like to neaten the join between first and last stitch, by placing my needle through the first stitch bound off, wrapping the yarn around it and pulling through to create another stitch, then passing the last stitch of the bind off over this stitch. Cut the yarn and pull through the last stitch on your needle.

The cast/bound off stitches lie flat and the fabric is unruffled. This gives a nice neat professional-looking finish.

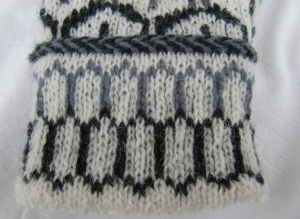
This last photograph shows the right side of the cuff completed, with the Latvian Braid. The join at the first row below the Braid is undetectable.


Feather Cap Beanie Pattern Released!

The Feather Cap Beanie pattern is now available from the Granary Knits Pattern store.

Feather Cap is a stranded knit hat, using ten colours of Jamieson’s of Shetland wonderful pure wool Spindrift yarn. The motif itself and the colours I have chosen reflect the feather patterns and colours of my lovely Cream Legbar chickens: Freddie, Sorrel, Sage, and Lavender. From a distance they look a like a dull brown, but close up, their feathers are a beautiful brown/grey, with touches of cream and pink. The four background colours and six foreground colours reflect this lovely effect.

composite

compositehat

The pattern gives three sizes; teen/small adult, adult, and large adult. In addition to the subdued palette I also provide suggestions for a more brightly coloured palette and for a monochrome colourway in shades of grey.

There are matching mittens (full mitten and fingerless) and a matching cowl, also now available.

https://www.ravelry.com/patterns/library/feather-cap-beanie

Raspberry Pi Shawl Pattern Published

I am delighted to announce that my very first pattern has been published today in the Granary Knits Pattern Store. The pattern is for a lovely circular shawl, designed using Elizabeth Zimmermann’s Pi Shawl principle, hence the name!

raspberryPi_centre_tiny

This is not a difficult pattern! I have written it to appeal to both beginners in knitted lace as well as experienced knitters. It has been tech-edited and tested by three test knitters, using both four-ply and lace yarns. My original shawl was knitted in Debbie Bliss Fine Donegal four-ply yarn, but any four-ply, sport or DK yarn could be used. It looks especially lovely in a long-colour-change yarn.

raspberrypi_hanging2

You can see the pattern page, and buy the pattern, in the Granary Knits Pattern store.