For over a year now, I have been working on a collection of shawls and related accessories inspired by the Yorkshire countryside in which I live. It has been a magical experience, exploring my surroundings and being enthused by the landscape. The first two shawls in this collection, Harden Moss and Whitley Common, are available now, with more to come.
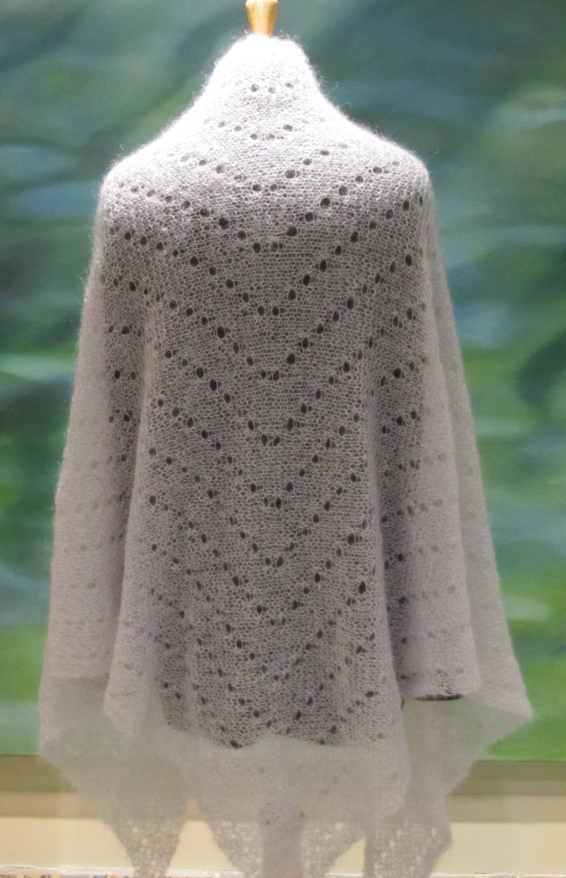
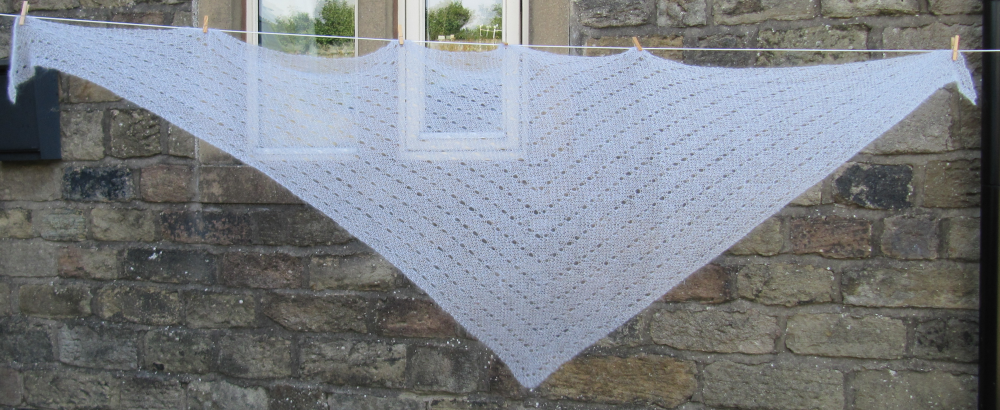
Harden Moss was inspired by the shapes of reservoirs in the High Peak District of Derbyshire and West Yorkshire. These typically have a distinct wide dam wall at one end gradually narrowing to a point, reflecting the shape of the valley that was flooded to create them. There are many such reservoirs dotted about all over the Peak District, varying in size from a small tarn to an entire rift such as Longdendale, flooded to provide water to local communities. This simple scrunchy garter shawl, worked sideways in a hazy laceweight yarn on very large needles, is quick to work, and the allover pattern of eyelets is easy to memorise. The pattern is available in the Granary Knits Payhip store and on Ravelry.
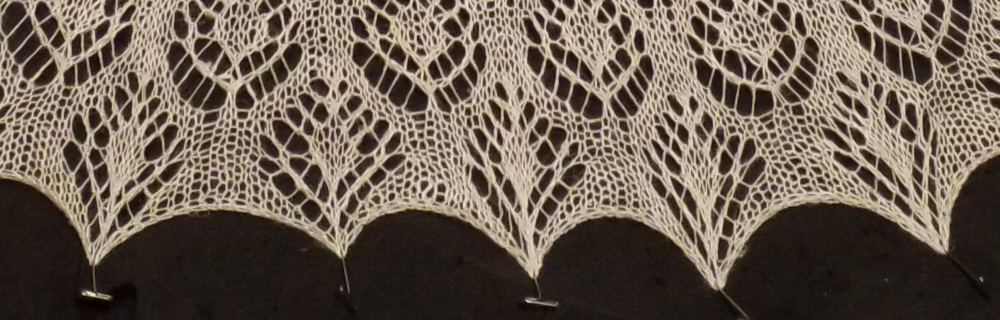
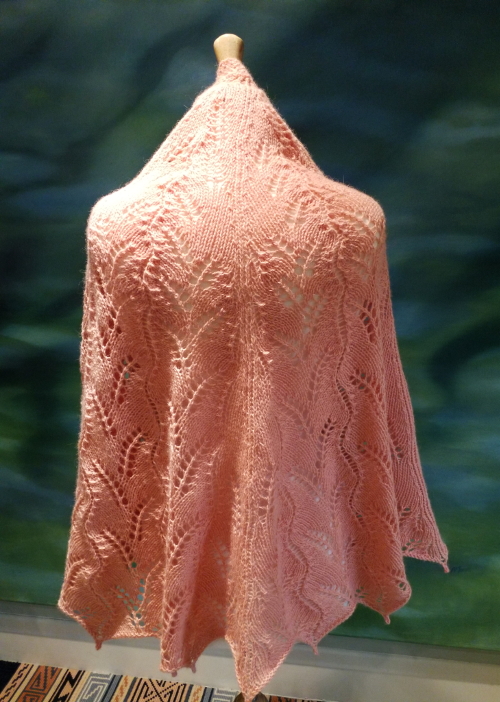
Whitley Common is a light capelet perfect for a summer wedding shawl. It’s shape is three-quarters-pi, and is covered in a graduated pattern of zigzags which mimics the many becks, streams, and rivulets that cover the heathery landscape. These lacy rivulets culminate in a border of flower motifs to represent the beautiful cotton grass that covers the common in summer. The pattern is available in the Granary Knits Payhip store and on Ravelry.
Another new pattern from me, a lovely semicircular shawl called The Wind That Shakes The Barley. It was inspired by the Irish folk song, and features ears of barley blown hither and thither. It has an interesting construction, being knit from the bottom edge of deep picot-tipped scallops to top, but despite the complicated-looking cast on it is a quick knit in DK weight yarn.
Hawkshaw Sheep Clotted Cream DK Coral
Malabrigo Rastita Glitter
Short version
Malabrigo Rastita Arco Iris
The pattern was first published in Knit Now magazine in March 2020.
Did you know that a group of geese on the ground is known as a gaggle, but in the air, flying in V-formation, it is known as a skein? I love the idea of geese and yarn being connected in this way.
Wild Geese flying into the sunset over our house
Wild geese fly over our house every Autumn, sometimes just one or two, sometimes in huge skeins of a hundred or more birds. They gather around our local reservoirs, ready to move off to their winter pastures. Their flight and call has long been a source of inspiration to me, and feeds into my sense of place in this landscape of dry stone walls, small streams and becks, hills and reservoirs.
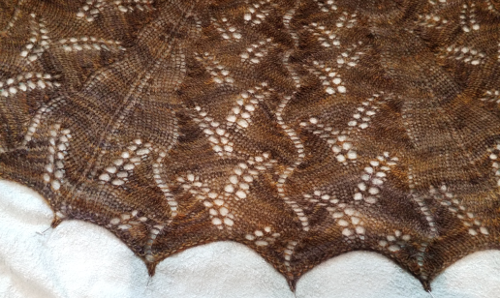
The Wild Geese Hap is my response to this Autumnal landscape. Its texture denotes the skeins of geese in flight, becoming gradually larger as the hap grows, divided by ridges forming the dry stone walls, and ending with the ripples on the surface of the reservoirs, in the colours of the Canada Goose. The hap can be finished with either a plain cast off, or a knit-on edging in a triangular lacy design which looks uncannily like the wing of a goose in flight.
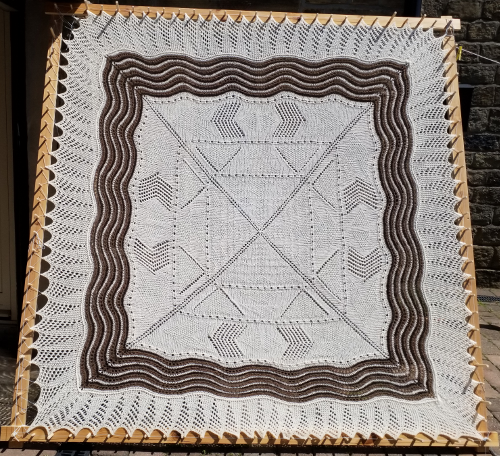
Wild Geese Hap blocking on a hap stretcher
The pattern for Wild Geese Hap is available from the Payhip Granary Knits Pattern Store. It features two sizes, a 2m square hap or a 1m square lapghan. It is knit in scrumptious aran/worsted weight yarn in lovely natural colours, and in the round from the centre out. I used Daughter of a Shepherd Ram Jam and Castlemilk Moorit DK (which knits up as aran weight) yarns for both the hap and the lapghan. I love the sheepiness of the DoaS yarns, their wonderful bloom when they have been washed and dried, the natural colours of sheep, and the sheer warmth of the finished item.
Blanket size
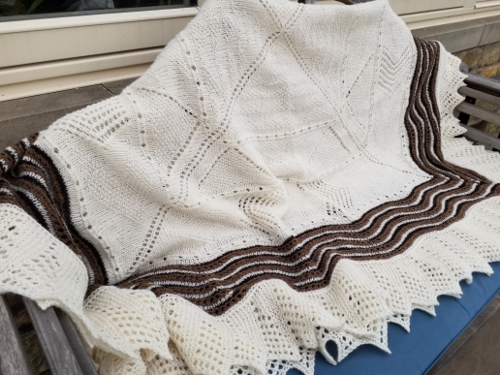
Both sizes of the Wild Geese Hap are worked from charts, from the centre out. The blanket size is shown above with the lace border; the lapghan, shown below, has been finished with a very stretchy simple cast off, which accentuates the rippled edging and the points at the corners.
A knitted on lace edging is a neat and beautiful way of finishing a shawl or blanket of any size or shape. It involves provisionally casting on for the edge, and, as you knit the lacy edge, gradually incorporating the live edge stitches from the shawl. The incorporation usually takes the form of using ssk (slip, slip, knit) to slip one edging stitch and one shawl stitch, then knitting them together through the back loop. The join is performed on every right side row, so one shawl stitch is bound off for every two edging rows knitted.
I shall illustrate this with a sample using the edging of the Wild Geese Hap (pattern available from the Granary Knits store), a square blanket with a pretty garter lace edging.
The setup up
The pattern for the edging will tell you how many stitches to provisionally cast on; using a length of waste yarn, cast on the required number of stitches. There are lots of tutorials on Youtube for provisional cast ons, some use crochet chains, some knit a few garter rows in waste yarn; experiment to find the one that is best for you.
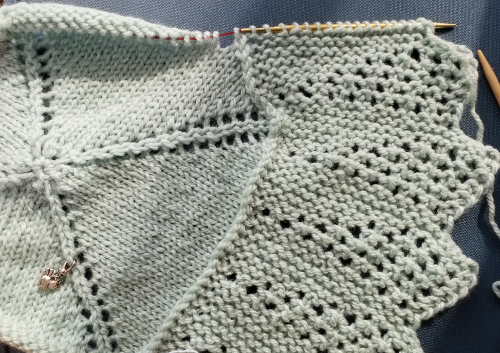
Identify the point on the edge of shawl where you will be starting, right side facing unless otherwise specified. The pattern should tell you where this is but will probably be the point where your live stitches start. In the example below, on the Wild Geese Hap, I start 1 stitch in from the corner and work one side first before I come to a corner.
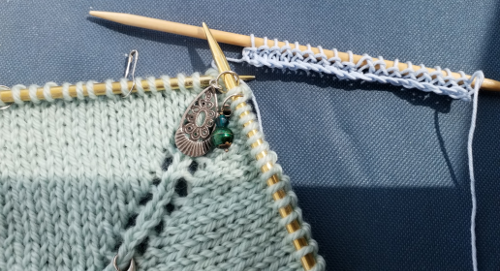
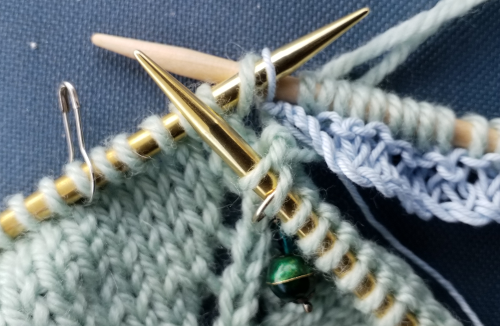
the ‘blanket’ (left) and the provisional stitches (right) positioned to begin joining
Using the working yarn for your shawl/blanket, work the first row of the edging until you reach the last stitch; the chart will probably show this as a ssk. Slip the last stitch of the edging knitwise, then slip the first live stitch you will be working on the shawl, also knitwise. Place the tip of the left-hand needle through the front of the two stitches on the right-hand needle, so that the needles are positioned as though you were about to knit them together through the back loop; knit them together through the back loop. You have made your first join stitch.
the slipped stitches ready to be knit through back loop
Turn the work and continue with the second row of the edging; this will almost certainly start with slipping the first stitch with yarn in front, which helps the edging to sit neatly and twists the stitch creating a decorative join.
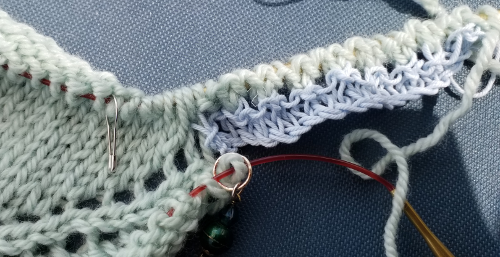
First 2 rows of the edging completed
You will find, as you work, that you are knitting the edge on in an anti-clockwise direction around the shawl; it is possible to work clockwise, but most patterns for this type of edging will work anti-clockwise, because it is simpler.
1 edging repeat completed1 side of the ‘blanket’ edging completed
Turning a corner
If the shawl or blanket you are working is circular, you will just carry on working the edging until you reach your starting point then graft the two edges together. If your shawl is triangular or square, however, you will have to turn the corner, and this will involve working extra edging repeat(s) in order to make a smooth turn. In the case of the Wild Geese Hap, the pattern has an obvious spine stitch marking the corner; I use this and the stitches either side of it for 1 repeat of the edging, i.e. I bind off 3 blanket stitches instead of 7. This is done by working multiple edging joins into 1 blanket stitch; here I work 2 into the first of the 3 corner stitches, 3 into the spine stitch, and 2 into the third blanket stitch.
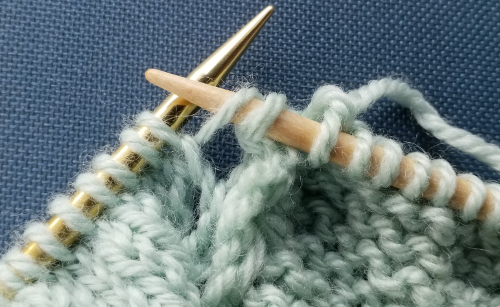
Begin by working the first 2 rows of the edging as normal, joining into the first of the 3 corner stitches; on row 3, when you reach the point of joining, slip the first stitch, then put the needle into the previously worked blanket corner stitch and lift it up so that you can knit into the back of the two loops.
working into the 1st corner stitch for a second time
Continue with edging rows 4 and 5, joining into the corner spine stitch; continue with rows 6 and 7, until you reach the join stitch; slip the first stitch as usual, then put the needle into the previously worked corner spine stitch and lift it up so that you can knit into the back of the two loops.
1st working into the corner spine stitch2nd working into the corner spine stitch
Repeat, so that you have 3 edge joining stitches into the one corner spine stitch.
Continue with the edging rows, and repeat the joining of two edge join stitches into the third corner stitch on the blanket.
joining into the third corner stitch
You should now have completed one repeat of the edging pattern turning the corner, binding off three corner stitches.
the complete turned corner
The hap corner on the blocking frame
Joining the end to the beginning
Once you have completed all the edging repeats and all the shawl/blanket stitches have been bound off, it is time to complete the edging by joining the live stitches to the provisional cast on.
For an invisible join, use Kitchener stitch/grafting; alternatively you could perform a three-needle bind off but this will leave a ridge on the underside of the shawl/blanket edge.
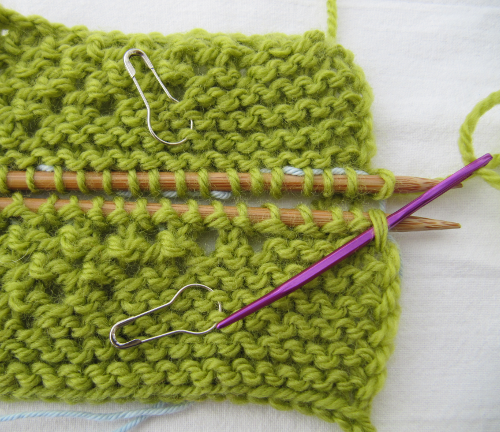
If you enjoy working Kitchener stitch, then this will hold no fears for you. If you don’t enjoy Kitchener stitch, well there is some good news – garter Kitchener is much much easier than stocking stitch Kitchener! Just to be on the safe side, I put a lifeline through the live stitches and through the cast on stitches (I didn’t need it but it was worth doing for peace of mind!). Also, I practised on a couple of samples, shown below in green yarn. It may seem like a lot of trouble to go to, but it ensured I did not make a mess of my edging when I came to do it for real.
The trick, with garter Kitchener, is to ensure that your two rows of stitches are aligned properly. You are going to be creating one additional row, therefore, when knitting your final edging repeat, you omit the very last row of the repeat as this is the row you will be creating with Kitchener stitch. You work on the right side of the knitting throughout.
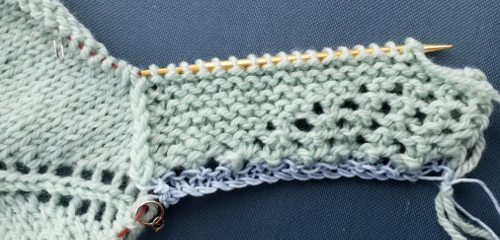
The first step is to undo the provisional cast on, and place the stitches from the first row of the edge onto a needle. The needle should be facing the same way as the needle holding your live end stitches. I began, as you can see, from the blanket end and worked out to the pointed edge. The calabash pins are there purely to mark the right sides for me.
Top piece is the end of the edging, lower piece is the start of the edging, right sides facing you
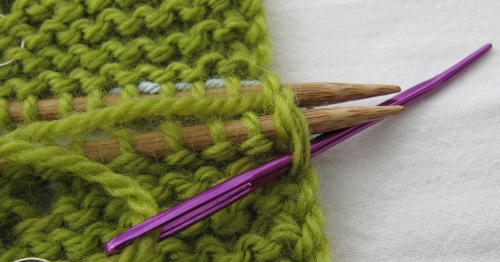
Cut your working yarn leaving a very long tail, at least 3 times the length of the seams to be grafted, to ensure you do not run out. Thread the tail onto a blunt-ended needle (mine is purple as you can see).
First the set up: Put the sewing needle tip through the first stitch on the lower needle, purlwise, and pull the yarn tail through. Leave the stitch on the needle.
Put the sewing needle tip through the first stitch on the upper needle, purlwise, and pull the yarn tail through. Leave the stitch on the needle.
Now the repeated stitches start: Put the sewing needle tip through the first stitch on the lower needle, knitwise, and pull the yarn tail through. Take the stitch off the lower needle.
Put the sewing needle tip through the first stitch on the lower needle, purlwise, and pull the yarn tail through. Leave the stitch on the lower needle.
Put the sewing needle tip through the first stitch on the upper needle, knitwise, and pull the yarn tail through. Take the stitch off the upper needle. Then purlwise through the next stitch on the upper needle and leave the stitch on the needle.
Continue in this way, until all stitches have been joined. The mantra for garter Kitchener stitch is:
Lower Needle: Knit and slip off, Purl and leave on. Upper Needle: Knit and slip off, Purl and leave on.
The completed graft on the hap blanket, in between the two pale blue lifelines, is invisible and lies flat.
I hope that you found this tutorial helpful and will be encouraged to try knitted on lace edges.
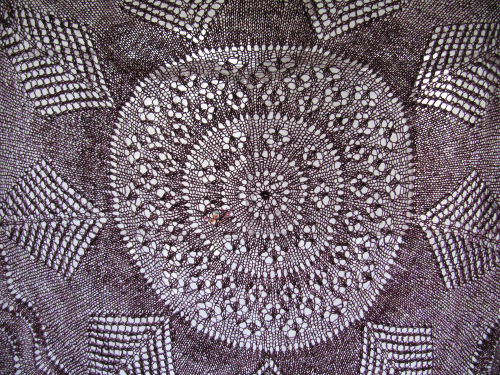
I am delighted to announce that my very first pattern has been published today in the Granary Knits Pattern Store. The pattern is for a lovely circular shawl, designed using Elizabeth Zimmermann’s Pi Shawl principle, hence the name!
This is not a difficult pattern! I have written it to appeal to both beginners in knitted lace as well as experienced knitters. It has been tech-edited and tested by three test knitters, using both four-ply and lace yarns. My original shawl was knitted in Debbie Bliss Fine Donegal four-ply yarn, but any four-ply, sport or DK yarn could be used. It looks especially lovely in a long-colour-change yarn.
Lace shawls are my favourite knitting project. I have knitted quite a few over the last few years. Last year I set myself a personal challenge to knit a shawl a month for twelve months, and I completed the challenge in February 2016. I loved doing it and it gave me great insight into the way shawls are constructed, and what makes a great shawl (as opposed to just a very nice shawl). The following is my selection of five superb lace shawl designers.
Rosemary Hill (Romi on Ravelry)
Romi does design the most beautiful shawls. Last year, during my personal challenge The Year of Knitting Lacily, I knitted Asterope from her collection of Seven Small Shawls Year 1: The Pleiades. In fact I bought several of her small shawl collections and could have knitted any one of them, they are all gorgeous! I love the attention to detail, the interesting construction, and in the case of Asterope, the stunningly beautiful border.
Verybusymonkey Verybusymonkey on Ravelry is a very busy lady indeed. She has published nine collections of shawls as ebooks, as wells as patterns for socks, hats, etc. Her trademark design feature is intricate patterning, not always lacy, that relates to the story of the shawl. For instance, she has designed several sets of shawls on the theme of scientists, shawls named Newton, Tesla, Darwin, Galileo, and so on; each shawl shows an element of the discovery for which that scientist is famous. So the Tesla shawl has a border representing alternating current; the Newton shawl illustrates Sir Isaac Newton’s Third Law of Motion; the Darwin shawl shows the evolution from a single simple shape through successive layers to a beautiful intricate border. I have not yet knitted Darwin, but I know I will soon!
Tesla
Nim Teasdale NimbleNim on Ravelry has produced a fabulous collection of shawl designs. I love the way they are constructed. She will provide two or more charts for a particular shawl and you decide, based upon how large you want the shawl or how much yarn you have at your disposal, on how many repeats to do of each pattern. It is a very flexible design methodology, and is a wonderful way of using up every scrap of a precious skein. During my challenge last year, I knitted two of her designs, Whirlwind Romance and Slow Dance, and I loved knitting both of them. On my ToDo list is Ashputtel and The Peacock’s Tale (although, really, I could knit any or all of them!)
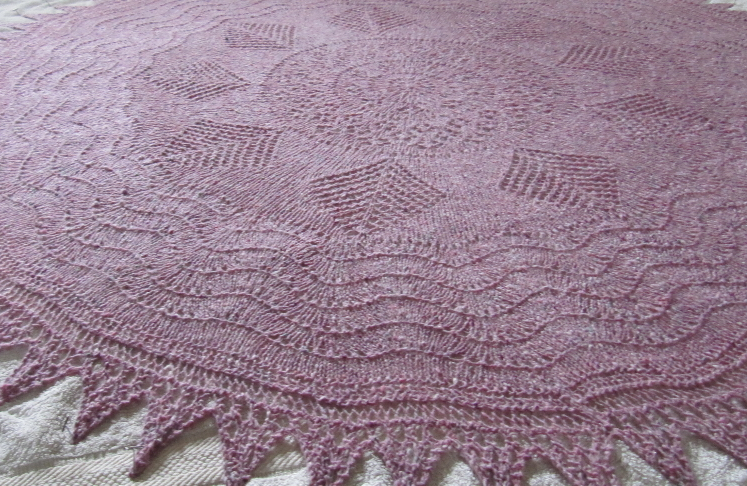
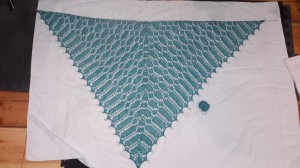
Jane Araujo Jane Araujo may not have the output of some of the designers listed here, but what she has produced are gorgeous! Nightsongs is the loveliest all-over-lace pattern you will ever see, and it is so easy! It is another pattern where, as long as you have enough yarn, you can just keep adding repeats, and I like patterns like that! I knitted my version in Baa Ram Ewe Titus, colourway Eccup (a lovely deep teal), but I’m thinking of knitting another one in a yarn with a long colour change, such as Kauni, as the samples that have been knitted in variegated yarns look stunning. So far I have only knitted Nightsongs, but Jane’s other shawls all feature on my ToDo list, starting with the wonderful conflagration of Lace and Entrelac that is Dianna.
Nightsongs
Anna Dalvi Anna Dalvi designs beautiful complex-looking shawls with a story behind each one. Her Mystic Shawls collection is full of beautiful airy lusciousness; The Ancient Egypt in Lace and Colour ebook has fascinating designs based on the symbolism of colour in ancient Egypt. I have not yet knitted any of Anna’s designs, but I do love drooling over the patterns! I particularly like the triangular shawl Seth for its bold geometric patterning; and Memphis, because it is a pi-shawl and I really want to knit a pi-shawl!
Seth, photo copyright Anna Dalvi, from the book Ancient Egypt in Lace and Colour
The vast majority of knitters go through life never having used a stitch marker. Even if they do need a marker for a project – to indicate a placeholder in a pattern repeat for instance, or to show where a round begins when knitting something in the round – they are quite likely to grab the nearest scrap of spare yarn, knot it into a little ring and slide it onto their needle. It doesn’t matter that it is cumbersome to use, won’t slip easily from one needle to the next, or gets inexplicably knitted into the fabric! It is only needed the once and can be discarded at the end of the project.
If, however, you are like me, and you love knitting complicated lace patterns, or intricate Fair Isle designs, then you find you need a constant supply of markers, and the little yarn rings are no longer adequate, indeed they are shown up as the irritating awkward things that they are, actually impacting your creativity and slowing your productivity .
I took up lace knitting about six years ago and immediately found that I had to buy some markers, as the pattern repeats were difficult to follow. I bought a set of five markers from my local yarn store, which had imported them from a women’s collective in India. They were fabulous, colourful paper beads made from recycled material, and they worked very well, but there was one small problem; the large ring that slips onto the knitting needle was a jump ring, and with use began to open slightly. It only took a very small gap to occur and my yarn kept getting caught in the ring, and I had to keep stopping and disentanging the yarn before I could continue knitting. I bought a second set, this time online, and since they were specially modelled polymer clay, they were quite expensive. But they were in the shape of chickens so well worth it! I experienced the same problem – the gap in the jump ring eased slightly open and the yarn snagged. So the price didn’t matter, the construction was the issue.
My husband, whose hobby is electronics, came up with a solution; solder the jump ring shut. He did this for the first set I had bought, and when I saw how effective the result was, I asked him to teach me soldering so that I could make some more markers.
I riffled through my jewellery box and came up with a couple of pairs if fancy, cheap earrings, the kind you buy to wear on holiday and then push to the back of a drawer when you get home. They were easy to take apart, and each pair yielded six or eight charms or beads. Once attached to 8mm jump rings – and soldered of course – these provided me with a tidy number of stitch markers.
Since then, I have made hundreds of stitch markers, from old bracelet charms and earrings, to new charms and beads found in the stash of shiny things left over from my jewellery-making hobby. Most I kept for myself, but some I gave to knitting friends and they encouraged me to try to sell them. I sell through my local yarn store, run by the lovely and supportive Mary, and in February 2016 I opened an Etsy store, listing some of my reclaimed and new one-of-a-kind stitch markers. It is early days yet, but I do see a market for well-made, unusual, slightly quirky knitting “jewellery”!


 charts for a particular shawl and you decide, based upon how large you want the shawl or how much yarn you have at your disposal, on how many repeats to do of each pattern. It is a very flexible design methodology, and is a wonderful way of using up every scrap of a precious skein. During my challenge last year, I knitted two of her designs,


