Did you know that a group of geese on the ground is known as a gaggle, but in the air, flying in V-formation, it is known as a skein? I love the idea of geese and yarn being connected in this way.
Wild Geese flying into the sunset over our house
Wild geese fly over our house every Autumn, sometimes just one or two, sometimes in huge skeins of a hundred or more birds. They gather around our local reservoirs, ready to move off to their winter pastures. Their flight and call has long been a source of inspiration to me, and feeds into my sense of place in this landscape of dry stone walls, small streams and becks, hills and reservoirs.
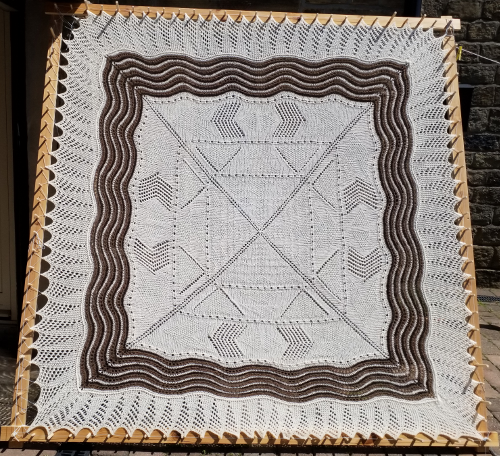
The Wild Geese Hap is my response to this Autumnal landscape. Its texture denotes the skeins of geese in flight, becoming gradually larger as the hap grows, divided by ridges forming the dry stone walls, and ending with the ripples on the surface of the reservoirs, in the colours of the Canada Goose. The hap can be finished with either a plain cast off, or a knit-on edging in a triangular lacy design which looks uncannily like the wing of a goose in flight.
Wild Geese Hap blocking on a hap stretcher
The pattern for Wild Geese Hap is available from the Payhip Granary Knits Pattern Store. It features two sizes, a 2m square hap or a 1m square lapghan. It is knit in scrumptious aran/worsted weight yarn in lovely natural colours, and in the round from the centre out. I used Daughter of a Shepherd Ram Jam and Castlemilk Moorit DK (which knits up as aran weight) yarns for both the hap and the lapghan. I love the sheepiness of the DoaS yarns, their wonderful bloom when they have been washed and dried, the natural colours of sheep, and the sheer warmth of the finished item.
Blanket size
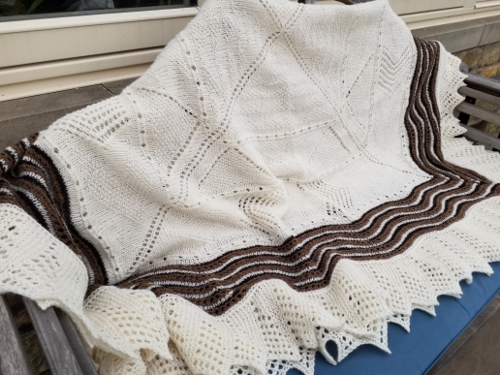
Both sizes of the Wild Geese Hap are worked from charts, from the centre out. The blanket size is shown above with the lace border; the lapghan, shown below, has been finished with a very stretchy simple cast off, which accentuates the rippled edging and the points at the corners.
A knitted on lace edging is a neat and beautiful way of finishing a shawl or blanket of any size or shape. It involves provisionally casting on for the edge, and, as you knit the lacy edge, gradually incorporating the live edge stitches from the shawl. The incorporation usually takes the form of using ssk (slip, slip, knit) to slip one edging stitch and one shawl stitch, then knitting them together through the back loop. The join is performed on every right side row, so one shawl stitch is bound off for every two edging rows knitted.
I shall illustrate this with a sample using the edging of the Wild Geese Hap (pattern available from the Granary Knits store), a square blanket with a pretty garter lace edging.
The setup up
The pattern for the edging will tell you how many stitches to provisionally cast on; using a length of waste yarn, cast on the required number of stitches. There are lots of tutorials on Youtube for provisional cast ons, some use crochet chains, some knit a few garter rows in waste yarn; experiment to find the one that is best for you.
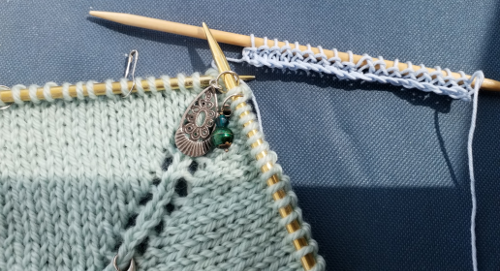
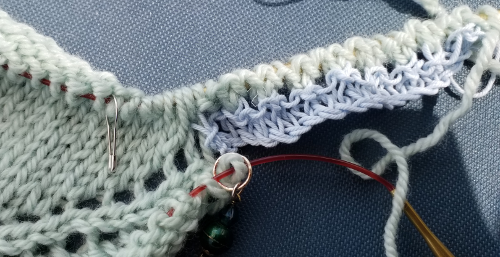
Identify the point on the edge of shawl where you will be starting, right side facing unless otherwise specified. The pattern should tell you where this is but will probably be the point where your live stitches start. In the example below, on the Wild Geese Hap, I start 1 stitch in from the corner and work one side first before I come to a corner.
the ‘blanket’ (left) and the provisional stitches (right) positioned to begin joining
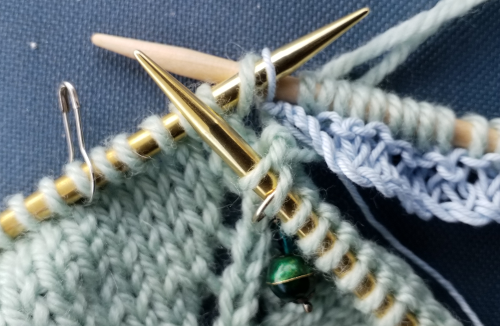
Using the working yarn for your shawl/blanket, work the first row of the edging until you reach the last stitch; the chart will probably show this as a ssk. Slip the last stitch of the edging knitwise, then slip the first live stitch you will be working on the shawl, also knitwise. Place the tip of the left-hand needle through the front of the two stitches on the right-hand needle, so that the needles are positioned as though you were about to knit them together through the back loop; knit them together through the back loop. You have made your first join stitch.
the slipped stitches ready to be knit through back loop
Turn the work and continue with the second row of the edging; this will almost certainly start with slipping the first stitch with yarn in front, which helps the edging to sit neatly and twists the stitch creating a decorative join.
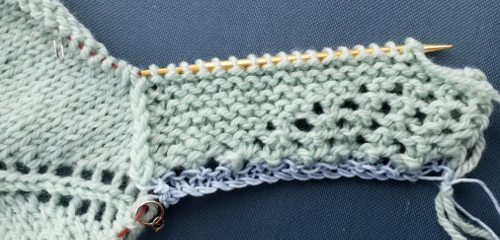
First 2 rows of the edging completed
You will find, as you work, that you are knitting the edge on in an anti-clockwise direction around the shawl; it is possible to work clockwise, but most patterns for this type of edging will work anti-clockwise, because it is simpler.
1 edging repeat completed1 side of the ‘blanket’ edging completed
Turning a corner
If the shawl or blanket you are working is circular, you will just carry on working the edging until you reach your starting point then graft the two edges together. If your shawl is triangular or square, however, you will have to turn the corner, and this will involve working extra edging repeat(s) in order to make a smooth turn. In the case of the Wild Geese Hap, the pattern has an obvious spine stitch marking the corner; I use this and the stitches either side of it for 1 repeat of the edging, i.e. I bind off 3 blanket stitches instead of 7. This is done by working multiple edging joins into 1 blanket stitch; here I work 2 into the first of the 3 corner stitches, 3 into the spine stitch, and 2 into the third blanket stitch.
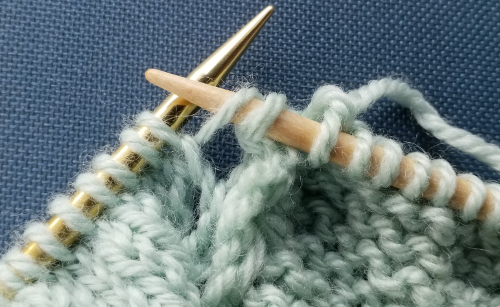
Begin by working the first 2 rows of the edging as normal, joining into the first of the 3 corner stitches; on row 3, when you reach the point of joining, slip the first stitch, then put the needle into the previously worked blanket corner stitch and lift it up so that you can knit into the back of the two loops.
working into the 1st corner stitch for a second time
Continue with edging rows 4 and 5, joining into the corner spine stitch; continue with rows 6 and 7, until you reach the join stitch; slip the first stitch as usual, then put the needle into the previously worked corner spine stitch and lift it up so that you can knit into the back of the two loops.
1st working into the corner spine stitch2nd working into the corner spine stitch
Repeat, so that you have 3 edge joining stitches into the one corner spine stitch.
Continue with the edging rows, and repeat the joining of two edge join stitches into the third corner stitch on the blanket.
joining into the third corner stitch
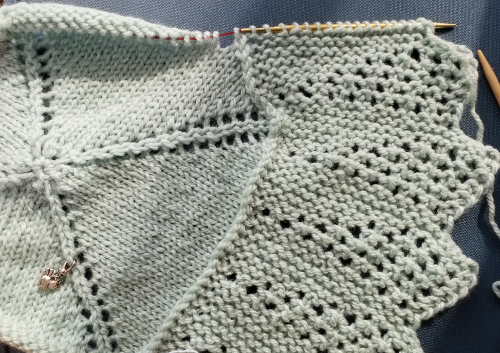
You should now have completed one repeat of the edging pattern turning the corner, binding off three corner stitches.
the complete turned corner
The hap corner on the blocking frame
Joining the end to the beginning
Once you have completed all the edging repeats and all the shawl/blanket stitches have been bound off, it is time to complete the edging by joining the live stitches to the provisional cast on.
For an invisible join, use Kitchener stitch/grafting; alternatively you could perform a three-needle bind off but this will leave a ridge on the underside of the shawl/blanket edge.
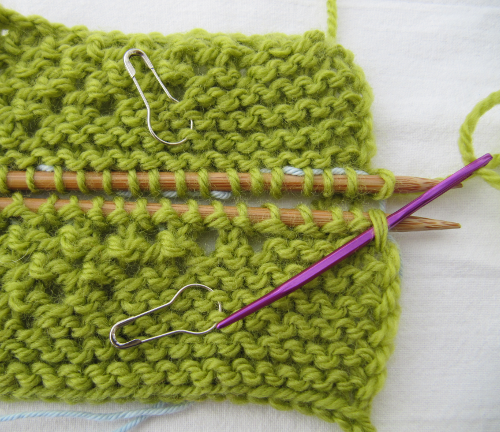
If you enjoy working Kitchener stitch, then this will hold no fears for you. If you don’t enjoy Kitchener stitch, well there is some good news – garter Kitchener is much much easier than stocking stitch Kitchener! Just to be on the safe side, I put a lifeline through the live stitches and through the cast on stitches (I didn’t need it but it was worth doing for peace of mind!). Also, I practised on a couple of samples, shown below in green yarn. It may seem like a lot of trouble to go to, but it ensured I did not make a mess of my edging when I came to do it for real.
The trick, with garter Kitchener, is to ensure that your two rows of stitches are aligned properly. You are going to be creating one additional row, therefore, when knitting your final edging repeat, you omit the very last row of the repeat as this is the row you will be creating with Kitchener stitch. You work on the right side of the knitting throughout.
The first step is to undo the provisional cast on, and place the stitches from the first row of the edge onto a needle. The needle should be facing the same way as the needle holding your live end stitches. I began, as you can see, from the blanket end and worked out to the pointed edge. The calabash pins are there purely to mark the right sides for me.
Top piece is the end of the edging, lower piece is the start of the edging, right sides facing you
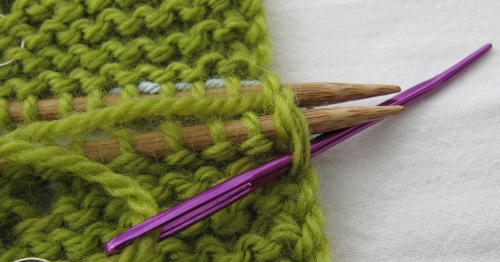
Cut your working yarn leaving a very long tail, at least 3 times the length of the seams to be grafted, to ensure you do not run out. Thread the tail onto a blunt-ended needle (mine is purple as you can see).
First the set up: Put the sewing needle tip through the first stitch on the lower needle, purlwise, and pull the yarn tail through. Leave the stitch on the needle.
Put the sewing needle tip through the first stitch on the upper needle, purlwise, and pull the yarn tail through. Leave the stitch on the needle.
Now the repeated stitches start: Put the sewing needle tip through the first stitch on the lower needle, knitwise, and pull the yarn tail through. Take the stitch off the lower needle.
Put the sewing needle tip through the first stitch on the lower needle, purlwise, and pull the yarn tail through. Leave the stitch on the lower needle.
Put the sewing needle tip through the first stitch on the upper needle, knitwise, and pull the yarn tail through. Take the stitch off the upper needle. Then purlwise through the next stitch on the upper needle and leave the stitch on the needle.
Continue in this way, until all stitches have been joined. The mantra for garter Kitchener stitch is:
Lower Needle: Knit and slip off, Purl and leave on. Upper Needle: Knit and slip off, Purl and leave on.
The completed graft on the hap blanket, in between the two pale blue lifelines, is invisible and lies flat.
I hope that you found this tutorial helpful and will be encouraged to try knitted on lace edges.
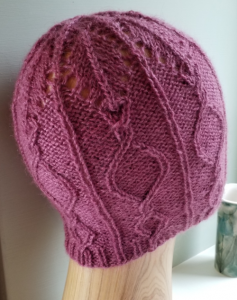
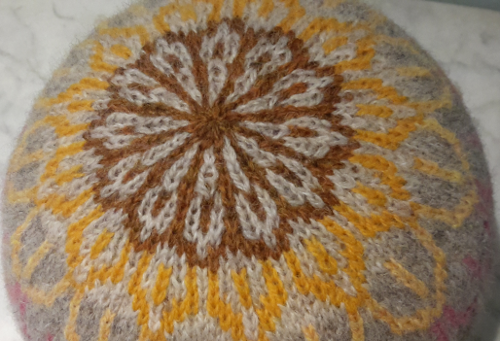
The sinuous pattern and lacy “head” for this hat was developed during my City and Guilds Handknit textiles course, and originally formed part of a table runner. But the image of the snake’s head would not lie still, and eventually I had to turn it into a wearable accessory.
Aran, DK and 4ply hats
The result is a cosy beanie/toque style hat, which can be knit in fingering/4ply, DK, or aran/worsted weight yarns, in a large range of sizes. I knit the samples in 3 different blends of wonderful Blacker yarns – Lyonesse 4ply, Tamar DK, and North Ronaldsay Aran.
Today sees the publication of my latest design, the Votic Hat. I have been very fortunate in having a preview of the lovely new yarn from Blacker Yarns, Cornish Garden, launched on 20th September 2019 as their 14th birthday yarn.
This is a beautiful soft woolly yarn in a gorgeous range of colours, and I have been delighted to provide a pattern knit in this yarn.
The design is based on a fragment of knitted material found during an archaeological dig in Estonia. The fragment dates from the 13th century and is believed to be from the cuff of a mitten. I have taken part of the motif shown in the fragment and created an unusual broken striped hat, which knits up perfectly in the 3ply/light fingering weight of Cornish Garden.
Thank you to Sue Blacker for giving me the opportunity to design with this lovely yarn.
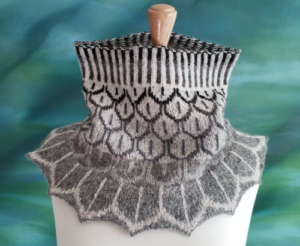
Feather Cowl complements the Feather Cap Beanie and Feather Mittens patterns previously published. It is worked in the round, in stranded colourwork, using ten colours of Jamieson’s of Shetland wonderful pure wool Spindrift yarn. The motif itself and the colours I have chosen reflect the feather patterns and colours of my flock of hens.
The pattern can be purchased from the Payhip Granary Knits Pattern store, either as the single pattern, or as part of the Chicken Knitting e-book containing all four patterns.
The textured design for this pattern sprang from my research into the fossils found at the Burgess Shale fossil site in Canada, a wealth of amazing plants and creatures which lived in the pre-Cambrian seas over 500 million years ago. Diagoniella was a protosponge, tubular in shape but with an intriguing diagonal skeletal structure which just cried out to be turned into knitting!
Short Cowl in Sublime Cotton Silk DK
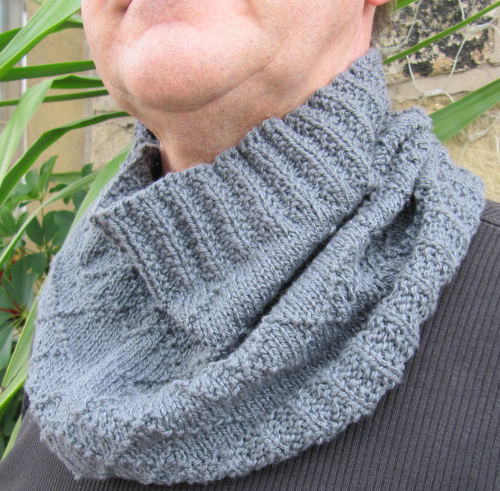
This cowl is designed to suit everyone. The textured pattern is understated but detailed enough to be interesting, and the deep moss ribbing ensures that cold winds are kept firmly away from the neck. It can easily be turned into a deeper cowl/snood by adding more vertical repeats of the pattern; it is written for knitting in the round. It was designed for someone who cannot tolerate wool next to the skin, and the yarn suggestions are both cotton blends that give excellent stitch definition. The cowl/snood can be knit in any DK weight yarn which has good stitch definition.
Snood in Rowan Softyak DK
Instructions are given for three sizes, a short cowl 25 cm (approx. 10”) tall; a medium cowl 40 cm (approx. 15 ½”); and a snood 55 cm (approx. 21 ¾”).
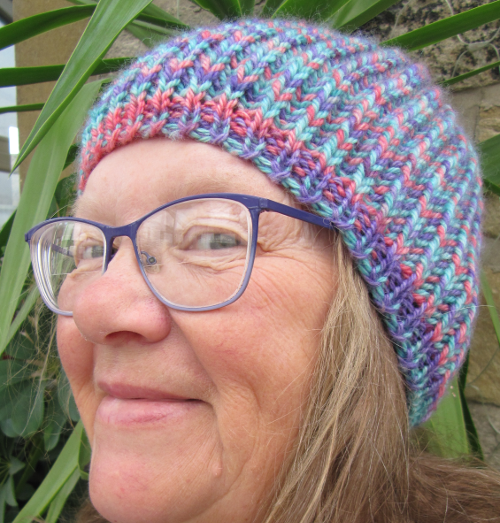
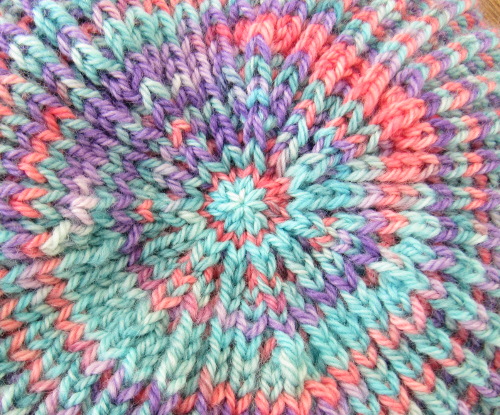
Fisherman’s Rib is a lovely squishy stitch which produces a warm and very stretchy fabric. It is ideal for hats as the stretchiness makes it a perfect fit for any sized head.
I knit my version in a lovely variegated organic Merino Aran weight yarn, from Felt Fusion on Etsy, but it looks equally lovely in plain coloured, tonal, or even self striping yarn.
Of all animals, I think I have always like birds the best, probably influenced by my Mother, who kept Zebra Finches, Canaries, and Lovebirds, and avidly watched the wild birds in her garden. She even had a Silkie cockerel, rescued from a school egg-hatching program and given the run of the house and garden for many years. It was not until 2007 that I kept any birds of my own, and I started with hens. I liked the idea of fresh eggs for breakfast, but the day we acquired Hetty, Betty, and Letty, was the day I lost my heart to them. As soon as I held one in my arms, I was smitten, and the longer I have kept them, and the better I understand them, the more I see their individual characters, their behavioural traits, their likes and dislikes, their amazing colouring, the variation of comb and wattle shapes, their unique song.
When I started designing knitted textiles, my flock of hens (and one cockerel) featured very prominently in my inspiration. This first collection of patterns is a result of that inspiration, and covers the stranded colourwork designs based upon feather shapes and colours.
Designed to match the Feather Cap Beanie, and the Fingerless Feather Mittens released a few weeks ago, these full mittens reflect the patterns and colours of my little flock of beautiful Cream Legbar hens (and one cockerel).
Full Feather Mitts are stranded knit mittens, using ten colours of Jamieson’s of Shetland wonderful pure wool Spindrift yarn. The motif itself and the colours I have chosen reflect the feather patterns and colours of my lovely Cream Legbar chickens: Freddie, Sorrel, Sage, and Lavender. From a distance they look a like a dull brown, but close up, their feathers are a beautiful brown/grey, with touches of cream and pink. The four background colours and six foreground colours reflect this lovely effect.
Sorrel
Suggestions are made for other colourways, notably a lovely monochrome palette.
Designed to match the Feather Cap Beanie, these fingerless mittens reflect the patterns and colours of my little flock of beautiful Cream Legbar hens (and one cockerel).
Fingerless Feather Mitts are stranded knit mittens, using ten colours of Jamieson’s of Shetland wonderful pure wool Spindrift yarn. The motif itself and the colours I have chosen reflect the feather patterns and colours of my lovely Cream Legbar chickens: Freddie, Sorrel, Sage, and Lavender. From a distance they look a like a dull brown, but close up, their feathers are a beautiful brown/grey, with touches of cream and pink. The four background colours and six foreground colours reflect this lovely effect.
Sorrel
Suggestions are made for other colourways, notably a lovely monochrome palette.