Ostara is the fourth festival in the Wheel of the Year. It falls on the Northern Hemisphere’s Spring Equinox, 20th March, and is also the celebration of Oestre, the goddess of fertility. Spring has arrived in the UK, leaves have appeared on many trees and shrubs, and daffodils are nodding in Spring breezes.
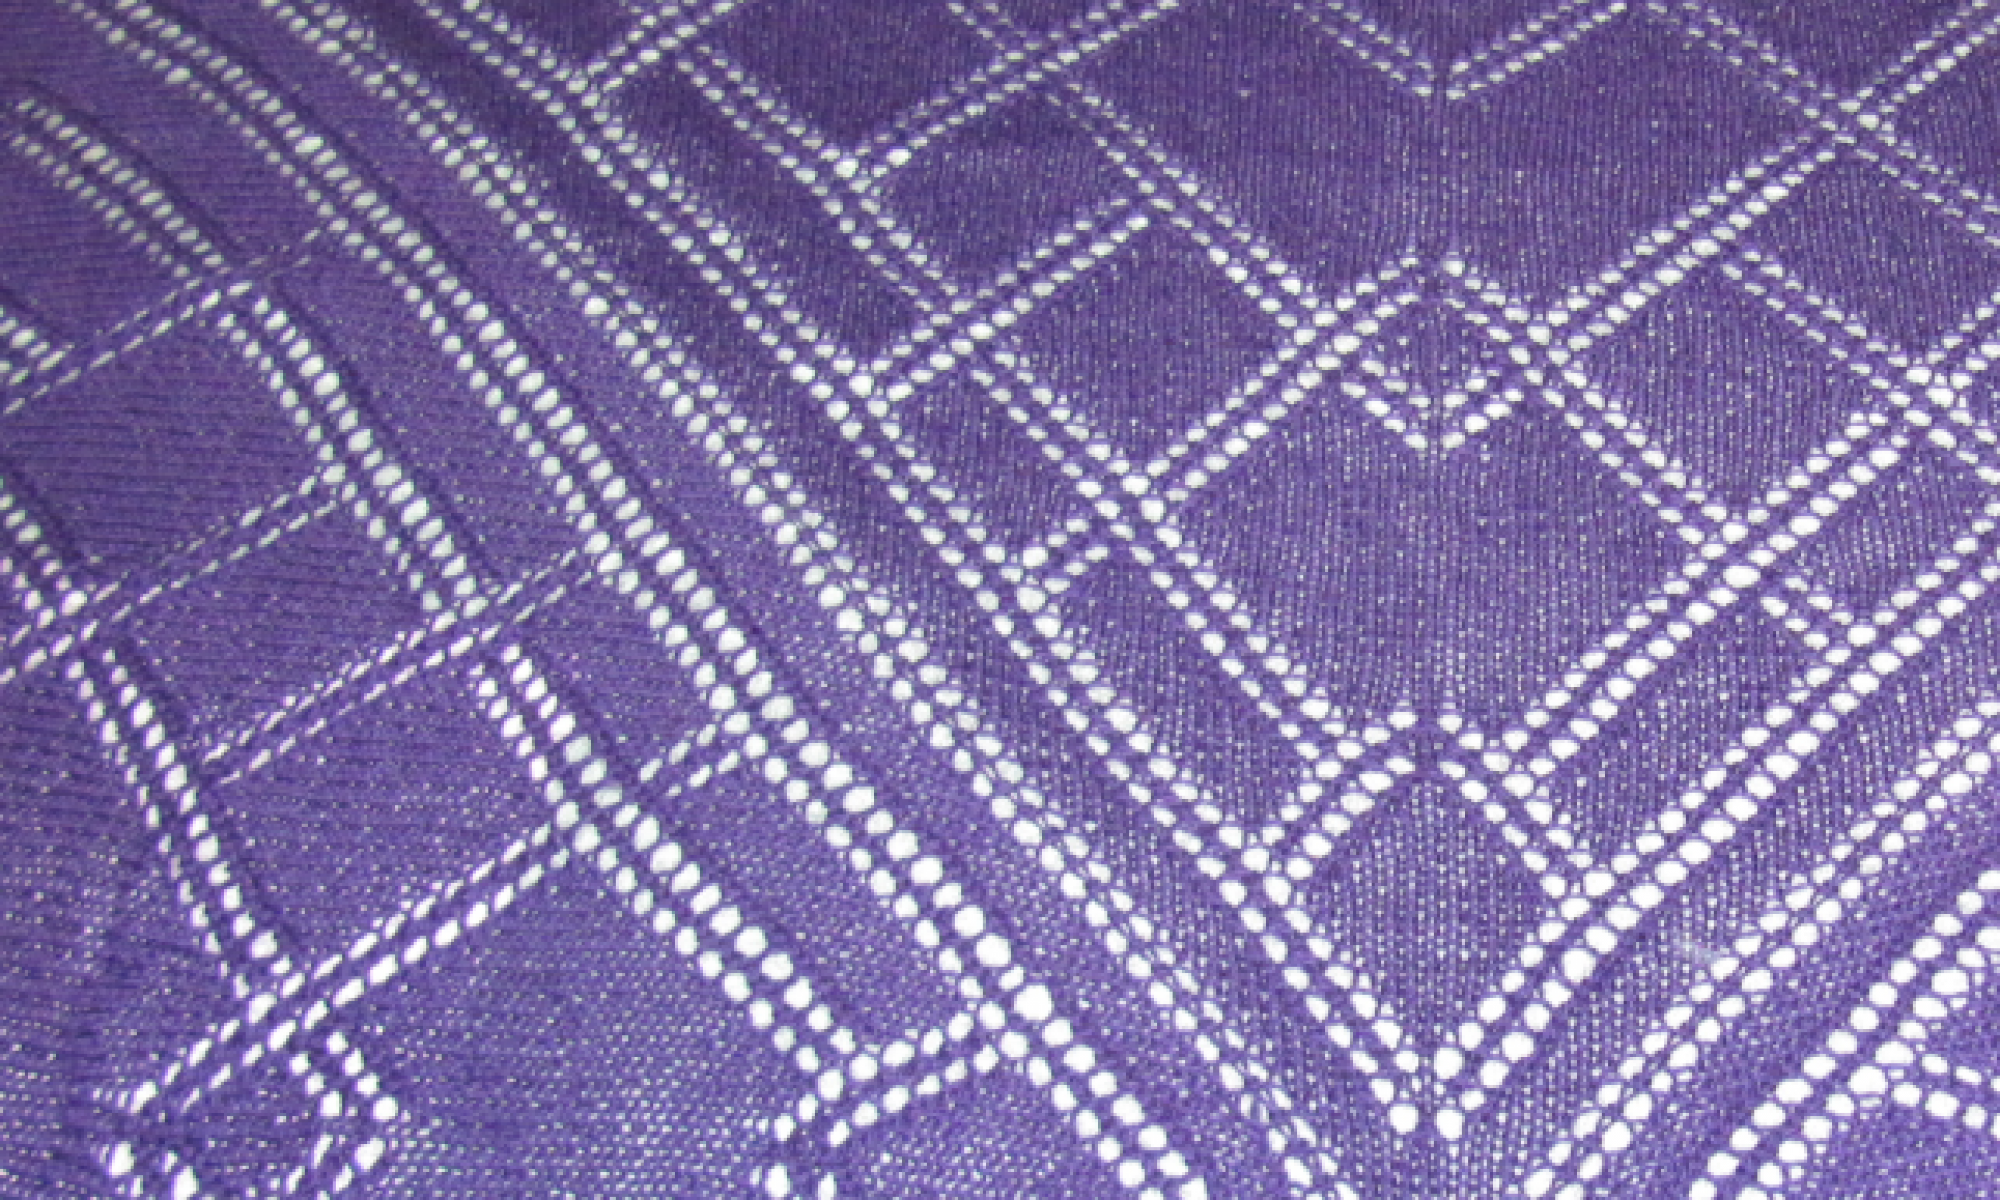
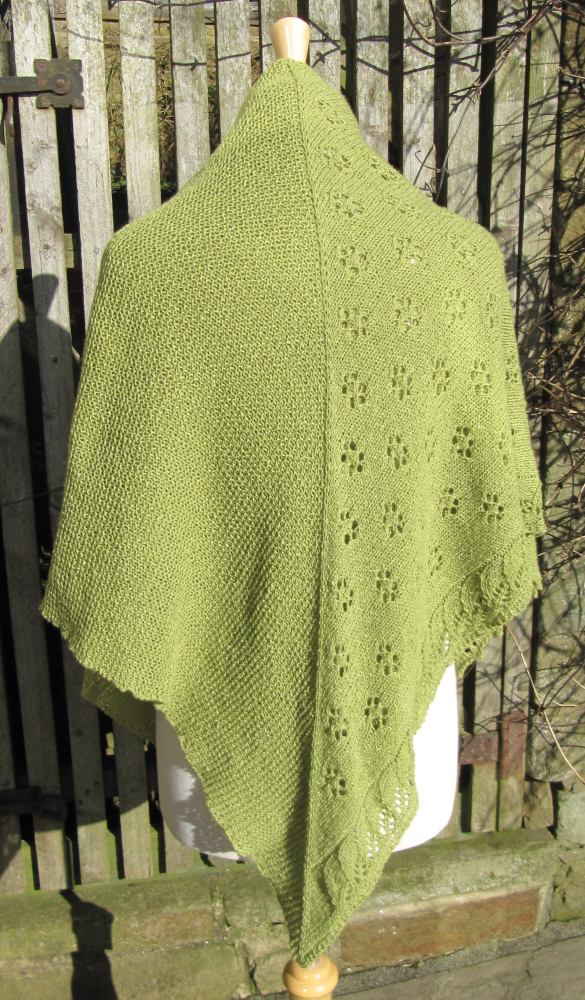
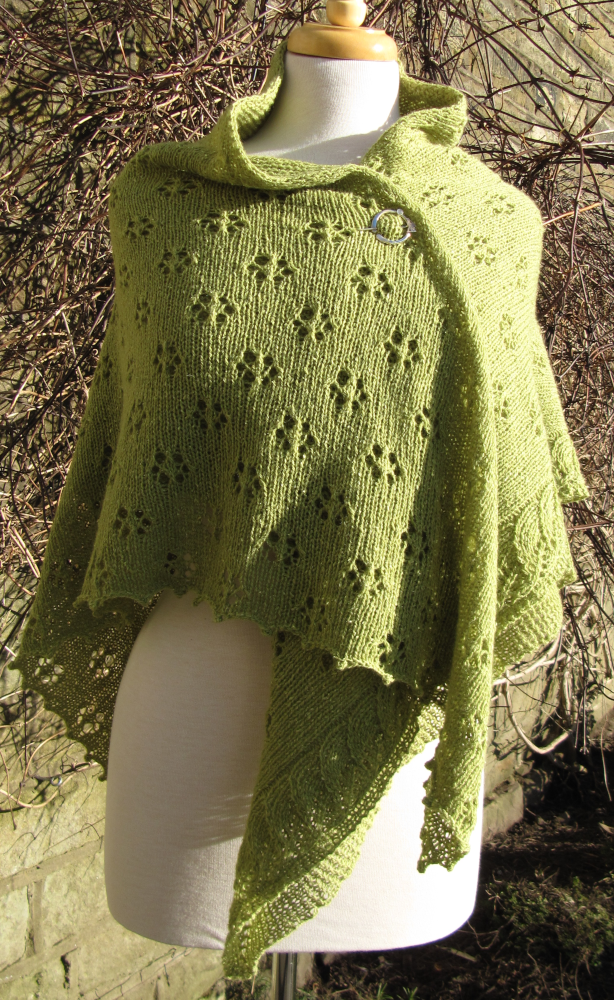
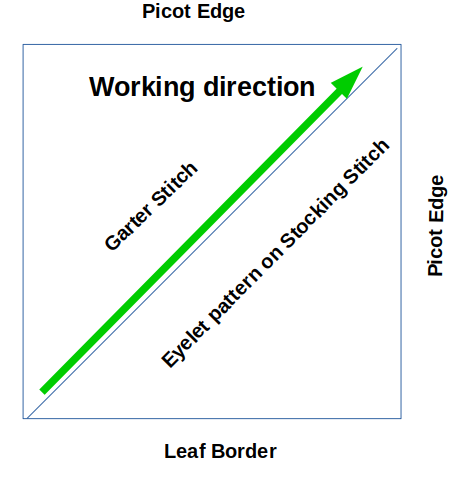
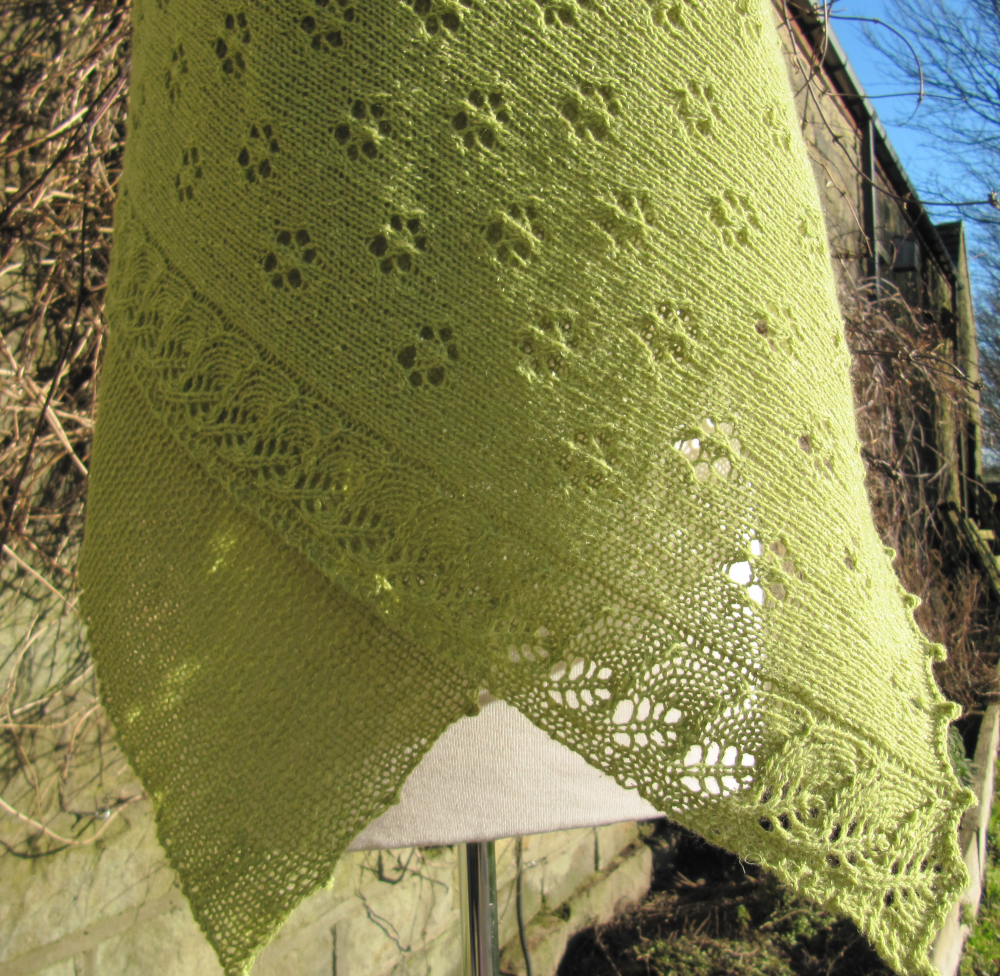
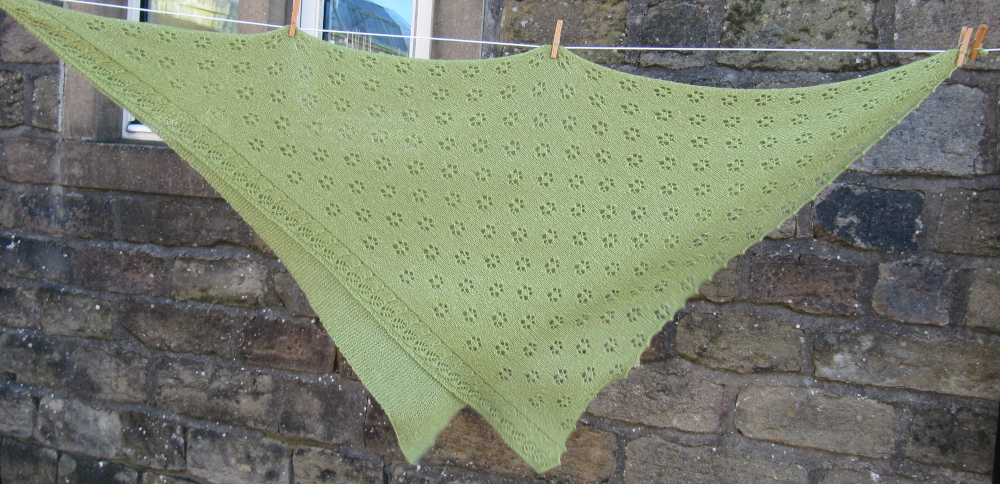
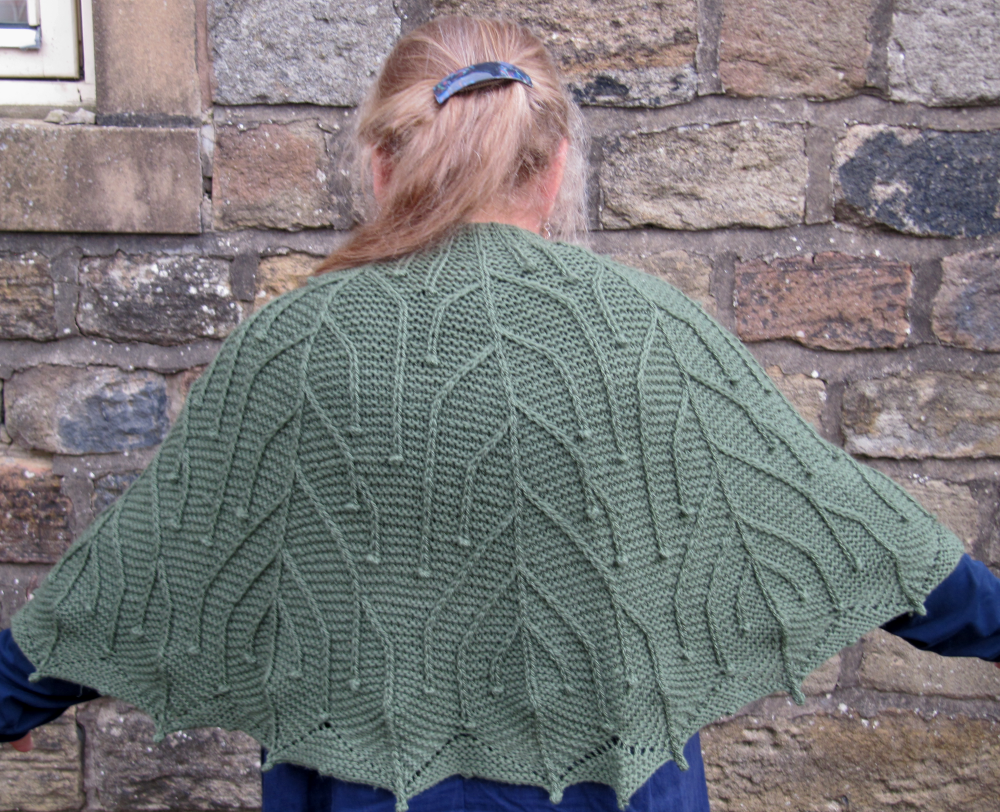
Ostara the shawl begins at the bottom left hand angle of a square and increases along the diagonal, the hypotenuse, with two halves of very different patterning, reflecting the equality of night and day. As it slowly grows, the leaves emerge along one edge and flowers begin to dot one half of the shawl. Folded along the centre spine it forms a warm layered shawl, opened out it becomes a lighter airy accessory for sunnier Spring days. I have chosen a lovely blend of wool and silk for this shawl, in a vibrant Spring green. Ostara can be blocked as a square, a rectangle, or a parallelogram. It can be worn in several ways: folded as a triangle along the diagonal centre stitch to show the flower side or the garter side; folded as a triangle across the diagonal to show one half flowers and one half garter; folded across the middle to make a narrower rectangle.
Ostara is an adaptable shawl, can be made to any size you choose, from a small square to a large enveloping folded triangle. Size is adjusted by repeating the main 24-row pattern; the sample shown, for instance, consists of a setup section followed by 11 repeats of the main section, and was blocked into a rectangle to give a shawl 137 cm/54 ¾” x 115 cm / 46”.
This construction lends itself readily to adaptation, and I have included, as a separate file, a lapghan pattern of the same construction but knit at a large gauge in bulky wool.
This pattern has been fully professionally tech edited, but has not been test knit except by me. Full pattern support is available by email.
Imbolc is the second Celtic celebration and the third festival in the Wheel of the Year. It falls on the first day of February, and is also celebrated as St Brigid’s Day. Winter is still gripping the islands of Britain, but there are signs of the coming of Spring and a sense that the sun will return soon. Small buds are beginning to appear on trees and shrubs, and snowdrops are emerging and flowering, half hidden in borders. The early flowers are grateful for any rain, but in February we in the north of England sometimes get too much rainfall – the old country name for February is Fill-dyke referring to the overflowing ditches along rural roads.
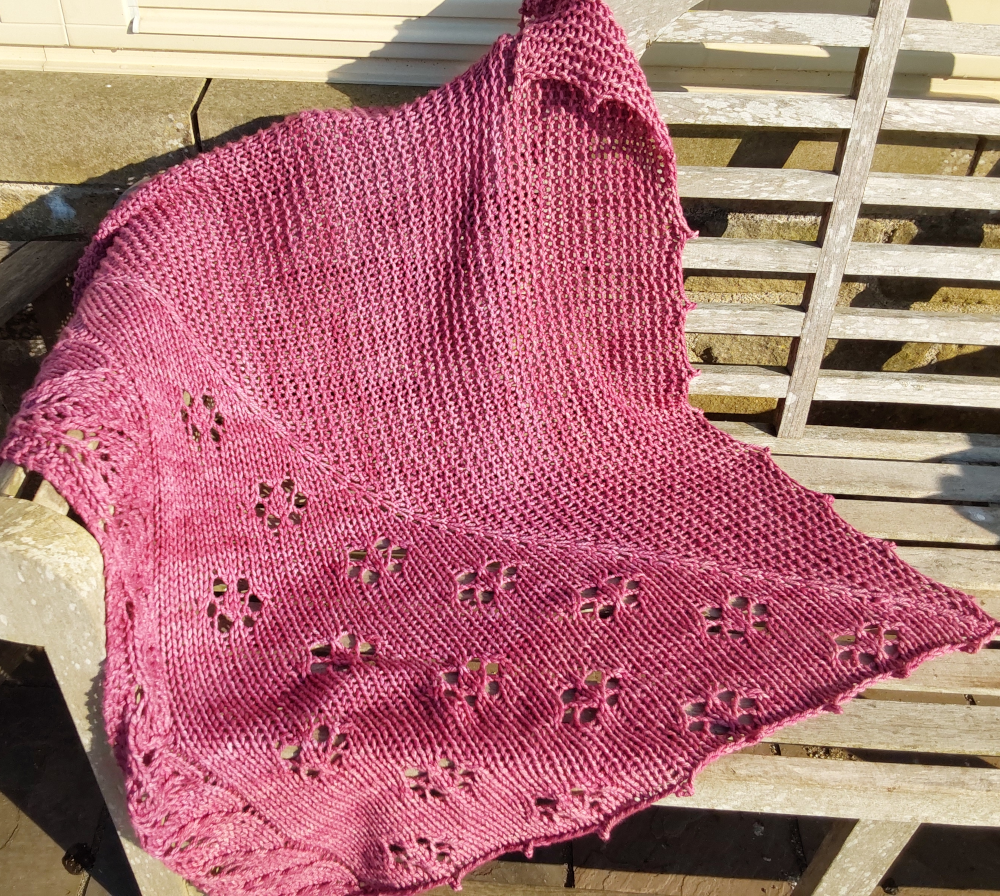
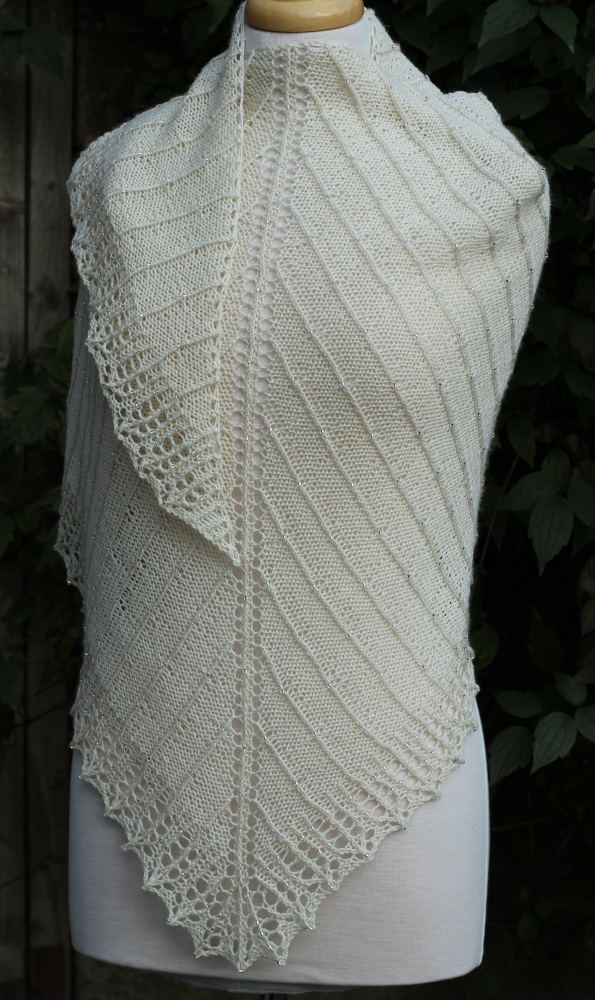
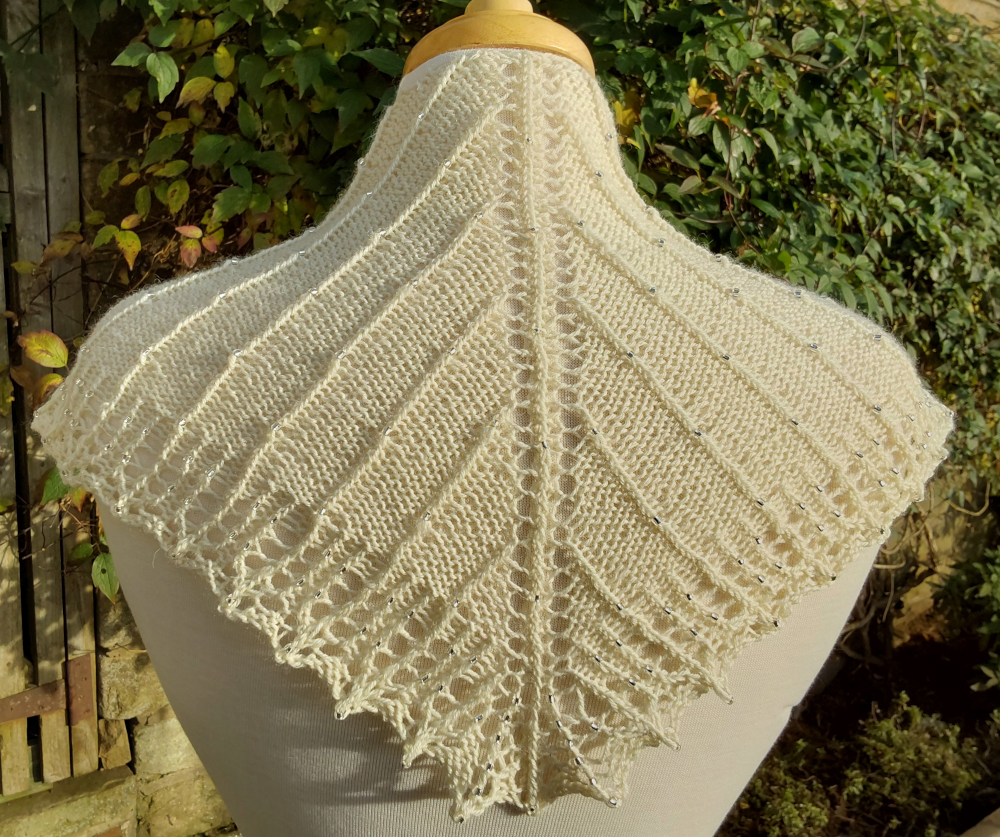
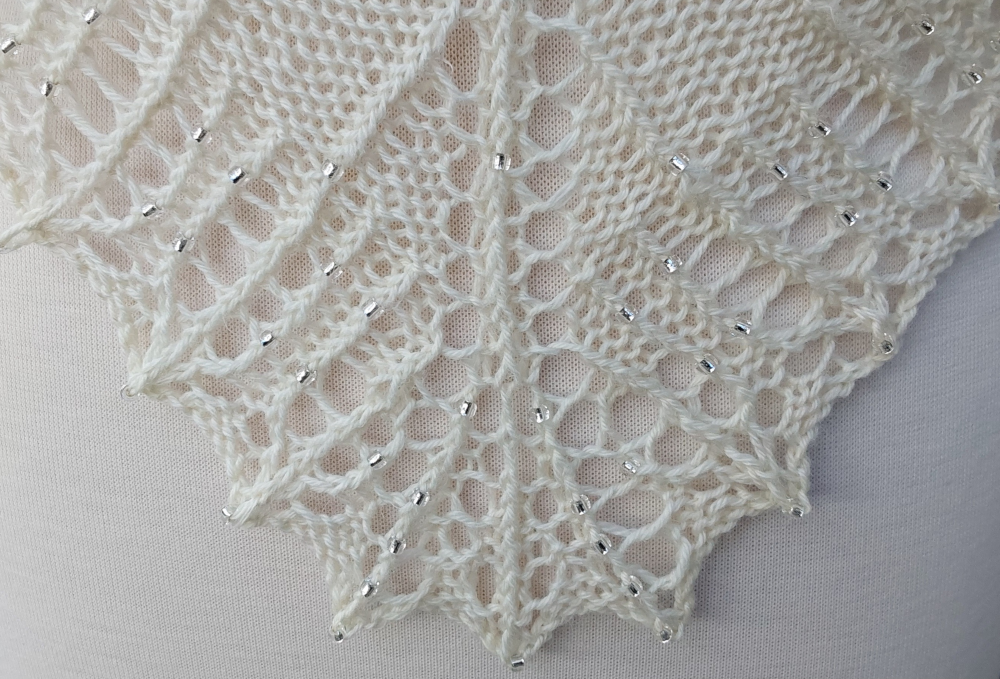
Imbolc the shawl is a delicate beaded crescent/triangle hybrid, equally at home at a winter party or snuggled up beside a log fire. Its design suggests the rain using beads, as well as the promise of Spring in the bud motifs of its border. It is knit in 4ply/fingering weight yarn, and can be made in any size by repeating the main pattern, before working the border. Both charts and written instructions are provided.
Materials Any 4ply/fingering weight yarn with good stitch definition and drape. The sample was knit in Eden Cottage Yarns Milburn 4ply; 85% Bluefaced Leicester 15% silk; 50 g per 200 m/ 218 yds; both the Fichu and Large Shawl are shown in shade Natural, using 1 and 4 balls respectively. 4 mm /#6 beads (optional); the sample beads are Debbie Abrahams in colour 34 Silver-lined Clear.
Tools 4 mm [US size 6] circular needle (for knitting flat), minimum 60 cm / 24” in length (or size required to obtain gauge). Crochet hook size 1 mm [UK size 4, US size 10] or beading needle (optional). Stitch markers, as many as you find helpful. Tapestry needle for weaving in ends. Blocking mat and pins (optional but recommended).
Tension 19 sts and 36 rows = 10 cm / 4” on 4 mm [US size 6] needles, over the reverse stocking stitch and beaded twisted stitch pattern after washing and blocking.
Finished size Four sizes are described, but a larger shawl is possible if desired. I have named these sizes Fichu (Shawlette, Medium Shawl, Large Shawl). The table below shows approximate sizes and quantities of yarn and beads. Finished size of the two samples (smallest and largest) shown are: Size 1 Fichu: 140 cm / 56” length along top x 26 cm / 10 ¼” deep at widest point. Size 4 Large Shawl: 254 cm / 101 ¼” length along top x 48 cm / 19 ¼” deep at widest point.
This pattern has been fully professionally tech edited, but has not been test knit except by me. Full pattern support is available by email. The pattern is available as a PDF from the Granary Knits stores on Ravelry and on Payhip.
Yule is the second pattern in The Wheel of the Year Collection.
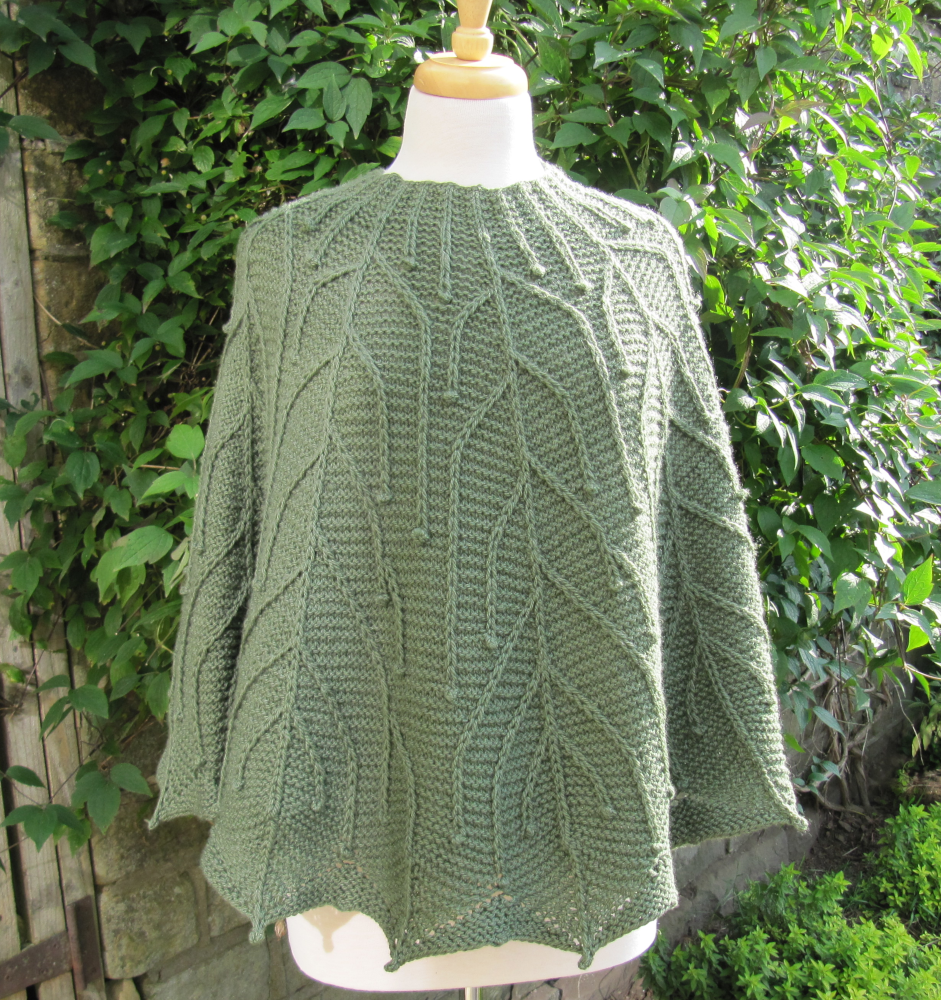
Yule is a time of celebration, a time to feast on the riches the earth has provided throughout the year and stored against a harsh winter. Yule, originally a twelve-day festival, in modern times occurs on (or around) 21st December and is also known as the Winter Solstice in the Northern Hemisphere. The Holly King is now in the ascendant, and the design of the Yule Shawl reflects his reign.
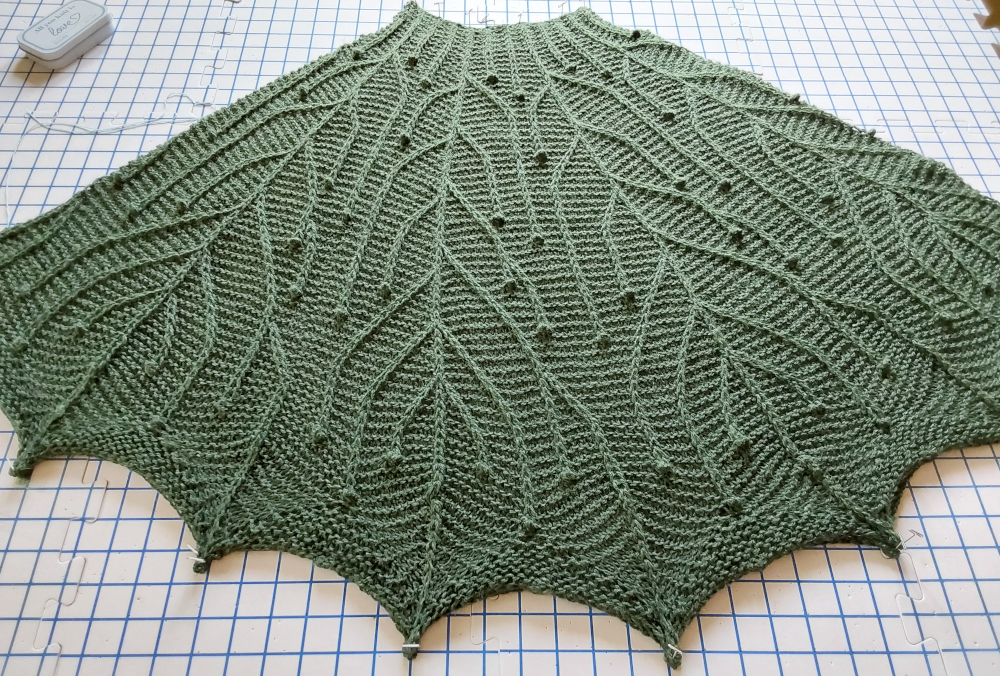
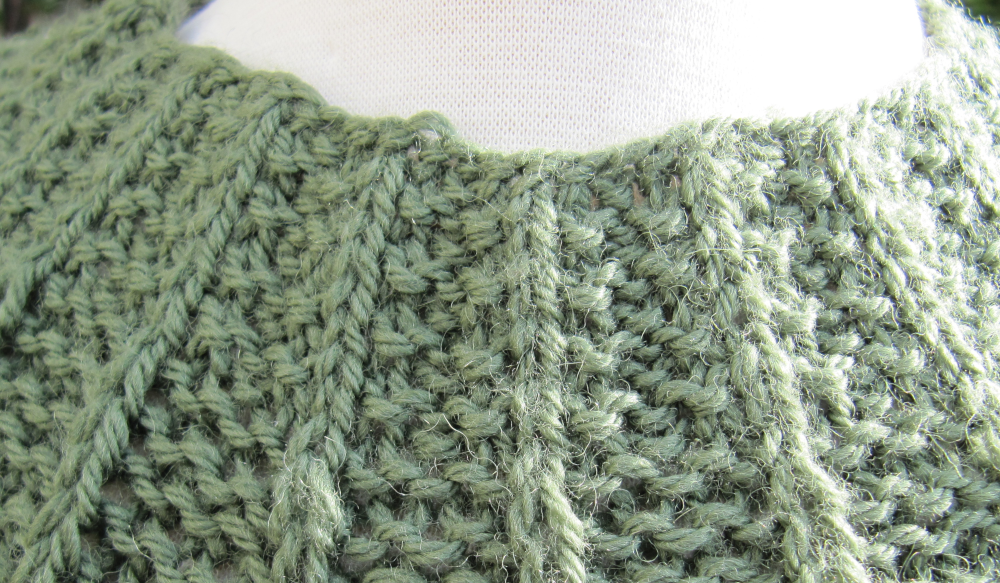
Yule is a circular loose-fitting cape, knit in the round using an Aran weight yarn for warmth. The relaxed fit caters for a wide range of sizes, and allows plenty of room for arms to move. It has an all-over pattern of branches and holly berries, and an edge reminiscent of the holly leaf. The background to the pattern is garter in the round, and the branches are formed with a combination of slipped stitches, slipped travelling stitches, and knots. The travelling stitches can be worked with or without a cable needle.
Sizes given in the pattern: teen chest size: 70 – 99 cm / 28 – 39 ¾” medium adult chest size: 100 – 125 cm / 40 – 50” large adult chest size: 126 – 150 cm / 50 ½ – 60”
Yarn requirements for the three sizes: teen 750 m / 820 yds medium adult 830 m / 908 yds large adult 950 m / 1,039 yds
Depth of the cape is the same for all sizes, 56 cm / 22 ½”, but may be lengthened (or shortened a little) as described in the instructions.
The sample is shown in Medium Adult size; neck circumference 53 cm / 21 ¼”, length from neck to hem 56 cm / 22 ½”.
This pattern has been thoroughly and professionally tech edited, but has not been test knit except by me. Full pattern support is available by email.
In addition to the pattern instructions, I have produced a photo tutorial for making the knots on the surface and along the edge of the cape.
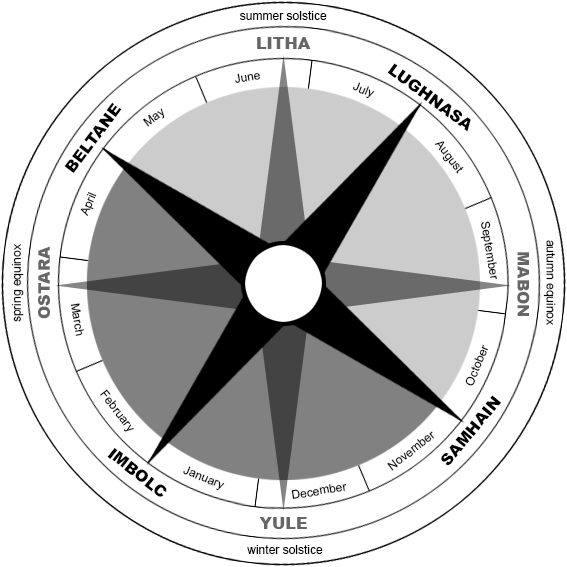
The Wheel of the Year is an annual cycle of seasonal festivals, observed by a range of modern pagans, marking the year’s chief solar events (solstices and equinoxes) and the midpoints between them. The Wheel of the Year was devised in the mid-20th century to combine the four solar events or quarter days marked by many European peoples, with the four seasonal festivals or cross-quarter days celebrated by Celtic peoples of the British Isles. Different paths of modern Paganism may vary regarding the precise timing of each celebration, based on such distinctions as the lunar phase and geographic hemisphere.
Observing the cycle of the seasons has been important to many people, both ancient and modern. Modern pagan festivals that rely on the Wheel are based to varying degrees on folk traditions, regardless of actual historical pagan practices. Some Wiccans use the term sabbat to refer to each festival.
In many traditions of modern paganism all things are considered to be cyclical, with time as a perpetual cycle of growth and retreat tied to the Sun’s annual death and rebirth. The days that fall on the landmarks of the yearly cycle traditionally mark the beginnings and middles of the four seasons. These eight festivals are the most significant times for community celebrations.
I was inspired to design this series of accessories, in part, by my close proximity to the seasonal cycles of growth (germinating seeds, growing fruit and vegetables, living in a sustainable way) and decay (composting, regrowth). I live a fairly agrarian existence, in the countryside away from urban populations, and I feel the turning of the year keenly.
The designs for this series of shawl and cowl patterns are inspired by the eight Wiccan / Pagan festivals or Sabbats, celebrated at key points in the calendar, plus a ninth design encompassing the whole cycle. I am not a follower of the religious practices but find that the festivals marked in the calendar resonate with me and my connection to the Earth and the landscape in which I live.
The Cycle begins with Samhain, the end of Autumn and the beginning of Winter in the northern hemisphere.
Wheel Image courtesy of CarlCastel, CC0, via Wikimedia Commons
Samhain
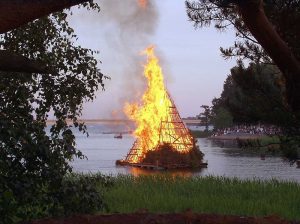
The celebration of Autumn’s end. The veil between the worlds is thin at this time, the year is dying.
Samhain (/ˈsɑːwɪn/) is the name of a traditional Gaelic festival held around 1 November. The name and date were adopted by Wiccans for one of their four Greater Sabbats. It closely matches Halloween (31 October) and the two festivals are intertwined. For Wiccans, Samhain is a time to celebrate the lives of those who have passed on, and it often involves paying respect to ancestors, family members, elders of the faith, friends, pets, and other loved ones who have died. Aligned with the contemporary observance of Halloween and Day of the Dead, in some traditions the spirits of the departed are invited to attend the festivities. It is seen as a festival of darkness, which is balanced at the opposite point of the Wheel by the festival of Beltane, which is celebrated as a festival of light and fertility. Many neopagans believe that the veil between this world and the afterlife is at its thinnest point of the year at Samhain, making it easier to communicate with those who have departed.
Some authorities claim the Christian festival of All Hallows Day (All Saints Day) and the preceding evening are appropriations of Samhain by early Christian missionaries to the British Isles.
The Design
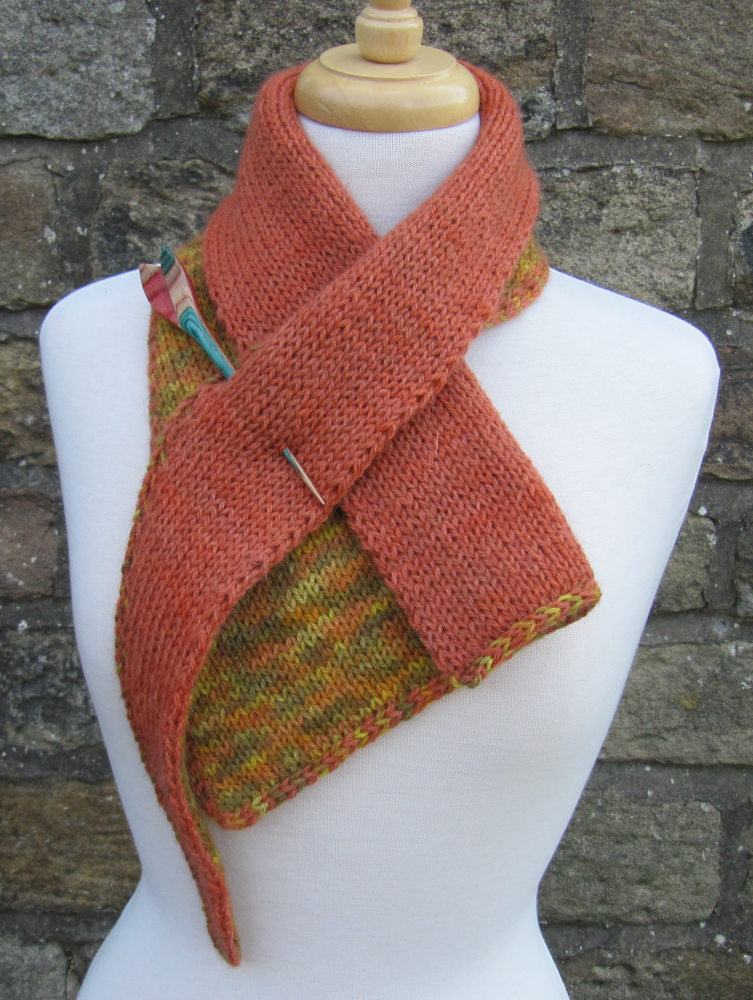
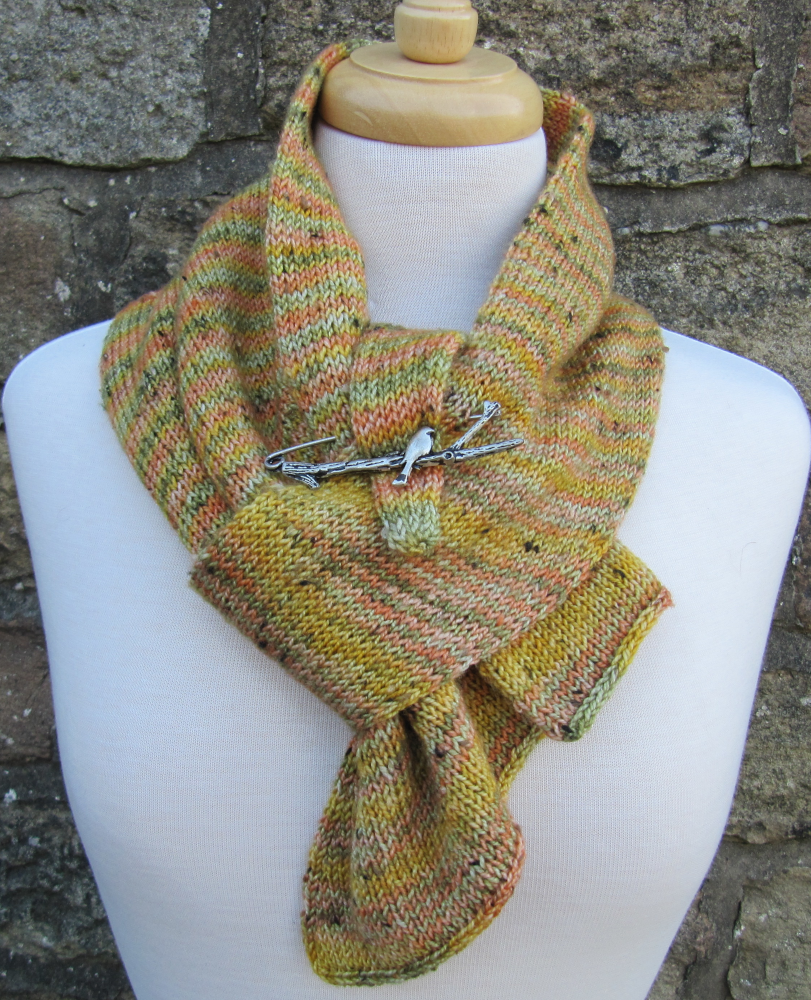
My interpretation of Samhain is of simplicity. It can be made as a cowl, using a single precious skein of 4ply/fingering yarn, or as a shawl. It can be knit in any weight of yarn, and can be made as long as you wish. As befits the time of the year, it gives warmth where it is needed. I chose reds and oranges for my samples, as well as a light grey reminiscent of misty autumn days.
Bulky weightDK weightlight fingering/sock weight
More information on the pattern and links to Ravelry and Payhip stores can be found on the pattern page. The pattern was published on 31st October 2024.
The next pattern will be Yule, published on 21st December 2024.
Samhain (pronounced Sa-win, /ˈsɑːwɪn/) is the first of the Celtic/Pagan Sabbats or festivals in the great Wheel of the Year, ever turning. It is the celebration of Autumn’s End occurring on 31 October/1 November. The veil between the worlds is thin at this time, the year is dying.
Samhain is the name of a traditional Gaelic festival held around 1 November. The name and date were adopted by Wiccans for one of their four Greater Sabbats. It closely matches Halloween (31 October) and the two festivals are intertwined. For Wiccans, Samhain is a time to celebrate the lives of those who have passed on, and it often involves paying respect to ancestors, family members, elders of the faith, friends, pets, and other loved ones who have died. Aligned with the contemporary observance of Halloween and Day of the Dead, in some traditions the spirits of the departed are invited to attend the festivities. It is seen as a festival of darkness, which is balanced at the opposite point of the Wheel by the festival of Beltane, which is celebrated as a festival of light and fertility.
Samhain is a time for bonfires, honouring the ancestors, and for contemplation when entering the quiet part of the year. A time when the earth sleeps and humans (and animals) need warmth and shelter. A snug triangular shawl or cowl will keep you warm until the year turns and the earth awakens.
My interpretation of Samhain is of simplicity. It can be made as a cowl, using a single precious skein of 4ply/fingering yarn, or as a shawl. It can be knit in any weight of yarn, and can be made as long as you wish. As befits the time of the year, it gives warmth where it is needed. I chose reds and oranges for my samples, as well as a light grey reminiscent of the mists of Autumn. It can be worn any way you like, casually tied or fastened with a favourite brooch or shawl pin.
It can be knit in any weight yarn, in any type of yarn, in one colour or two. It is a warm double-thickness fabric using an interesting construction, with a simple but effective shape.
Knots and bobbles add texture and interest to knitted garments and accessories, but there is no denying the fact that making them interrupts the flow of knitting. Bobbles, with their multi-row construction, can be such a distraction that people avoid adding them, which is a shame as they do look fabulous particularly tucked in amidst cables and other textured stitches. I find knots, however, are much easier to knit and look just as effective as bobbles, whilst taking less time to make and cause less disruption to the flow of knitting.
Knots can be made in any size, just use an odd number of stitches – 3 for small, 5 for medium, 7 for enormous (depending upon your yarn weight). They can be placed in the body of a garment or used as a type of picot along a cast off edge to add stretch and interest. Here I describe how I make the small cast off variety, followed by the larger surface detail knots. The basic principal is the same for any size of knot, edge or body.
Small Knots on a Cast Off Edge
Cast off up to the point where the small knot will be made, marked with a calabash pin. The cast off stitch on the RH needle, here, waits its turn.
Purl, knit, purl into the marked stitch (you could used k, p, k depending on the pattern, but purl first and last helps the knot to “sit” on the RS surface)
Reading from the left, pass the 2nd stitch on the RH needle over the 1st
Pass the 3rd stitch over the 1st
Pass the cast off stitch over the remaining knot stitch
The completed small edge knot, with the cast off stitches tucked behind it to enhance its prominence
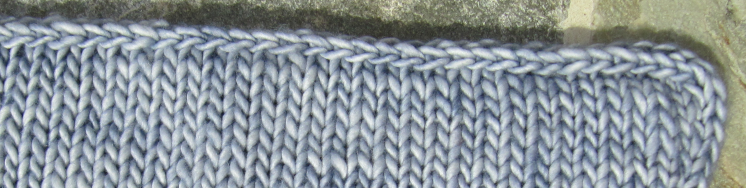
The completed edge showing a small 3-stitch knot in the centre of the curved edge, flanked by two 5-stitch knots
Close-up of the small 3-stitch knot, an unobtrusive but neat detail on the edge of a cape
Large Knots as Surface Detail
Large knots add texture and interest on the surface of a garment, and I find they are easier to make than bobbles.
At the point where the knot is to be made, (purl, knit, purl, knit, purl) into the stitch designated (you could used (k, p, k, p, k) depending on the pattern, but purl first and last helps the knot to “sit” on the RS surface). Here I am working into a slipped knit stitch.
A clearer view of the five stitches in one
Reading from the left, pass the 2nd stitch on the RH needle over the 1st
Pass the 3rd stitch over the 1st
Pass the 4th stitch over the 1st
Pass the 5th and last stitch over the 1st
The completed large knot
The completed knot after working a few more rows/rounds of the fabric
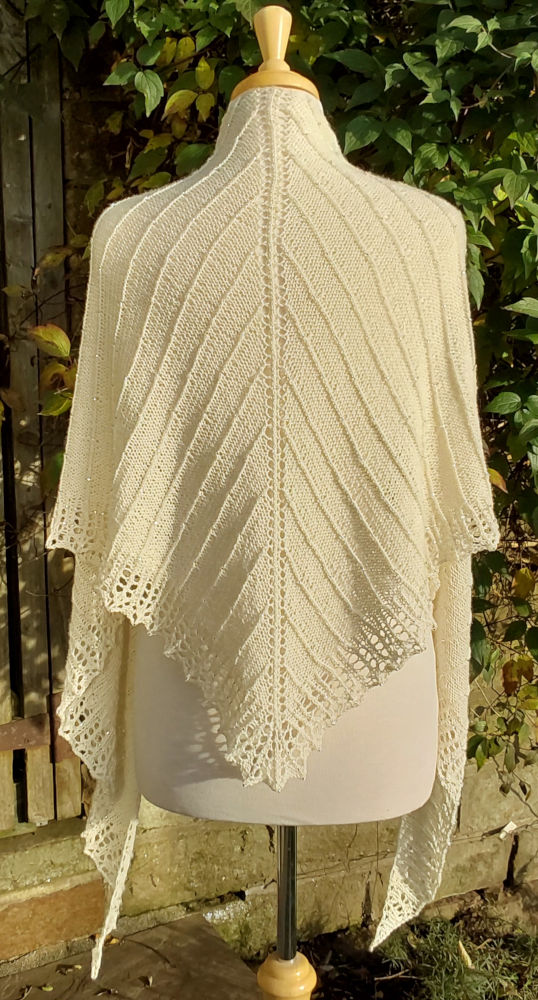
The samples shown here are of the Yule cape, second in the Wheel of the Year collection of shawls and accessories. The pattern will be published in December 2024.
In the Samhain shawl/cowl pattern, two variations of the lifted increase are used to achieve invisible shaping. Normally, lifted increases are designated either left- or right-leaning; but in Samhain I have chosen a slightly different approach, and this is fully described in the pattern itself. The photo tutorial here is in support of the pattern and is not a substitute for the detailed description given in the pattern. I have named the two increases as m1k and m1p; both are shown here.
M1K
I have reached the increase marker for the i-cord edge, the last stitch I worked was a slip stitch
Lift the purl bump of the i-cord edge stitch with RH needle
Place the stitch untwisted onto the LH needle
Knit into the purl bump through the back loop
M1P
I have reached my increase marker, this time, the last stitch worked was a knit stitch
Lift the purl bump of the i-cord edge stitch with RH needle
Place the stitch onto the LH needle without twisting
I-cord makes a stretchy and effective edging to a shawl, especially when it carries on from an i-cord edge along one side of said shawl. I use this bind off in my Samhain shawl/cowl, and I like the way it curves around to blunt and shape the corner of the shawl. Samhain is a double-layered accessory and for the cast off, in order to avoid flaring, the two layers are treated as one.
This is how it is worked
Knit the first two i-cord edge stitches, slip the third i-cord edge stitch knitwise
The three i-cord edge stitches are now on the RH needle. The next stitch is a knit, so I will slip that also knitwise.
The third i-cord edge stitch and the first (knit) stitch have been knitted together through the back loop – a standard ssk
Pass the three stitches from RH to LH needle without twisting them
Knit the first two i-cord edge stitches again, slip the third knitwise, then treating the next two stitches as one unit, slip them also knitwise
Knit the three slipped stitches together through the back loop
The three stitches on the RH needle are now the i-cord cast off, and the curve of the corner is already evident
Pass the three i-cord stitches back to the LH needle
A few more stitches cast off and the corner has taken shape with a smooth curve
The end of the i-cord, the yarn has been broken and threaded through the last stitches
At the end of the i-cord, break the yarn, secure the last stitch, and thread a darning needle. Work a mock knit stitch over the corner and weave the end in to the i-cord and between the layers of the fabric.